Microsoft unfortunately frequently changes the Entra UI all the time so screenshots get "old" quickly. An update that puts everything together start to finish on our side is desperately needed though.
Alright, let's do this.
Configuring SAML Authentication with Microsoft Entra ID and LFDS 11 Update 5+ (May 2024)
-----
Update 2025-05-19: Added Entra ID sign in button RGB color values.
-----
Update 2024-12-06: These configuration steps are valid for Directory Server 12. The screenshots show Directory Server 11; while the UI colors and layout may look slightly different, all relevant configuration fields are the same.
-----
The configuration described here should cover 90%+ of Laserfiche/Entra ID SAML SSO setups. The steps described here are not necessarily the only way to do things.
However, unless you have a good reason to do something differently and can clearly explain (1) why, (2) how it works, and (3) ideally how to implement it (in which case you likely don't need this guide in the first place), you probably shouldn't deviate.
If any of the images have text too small to read, try zooming in the browser window.
- If you're not running Laserfiche Directory Server (LFDS) 11 Update 5 or higher, upgrade first if at all possible. This guide has some instructions specific to Update 5 and higher. LFDS 11 Update 6 released April 1, 2024. See Software versions and fixes included in the Laserfiche 11 Download Package for release information.
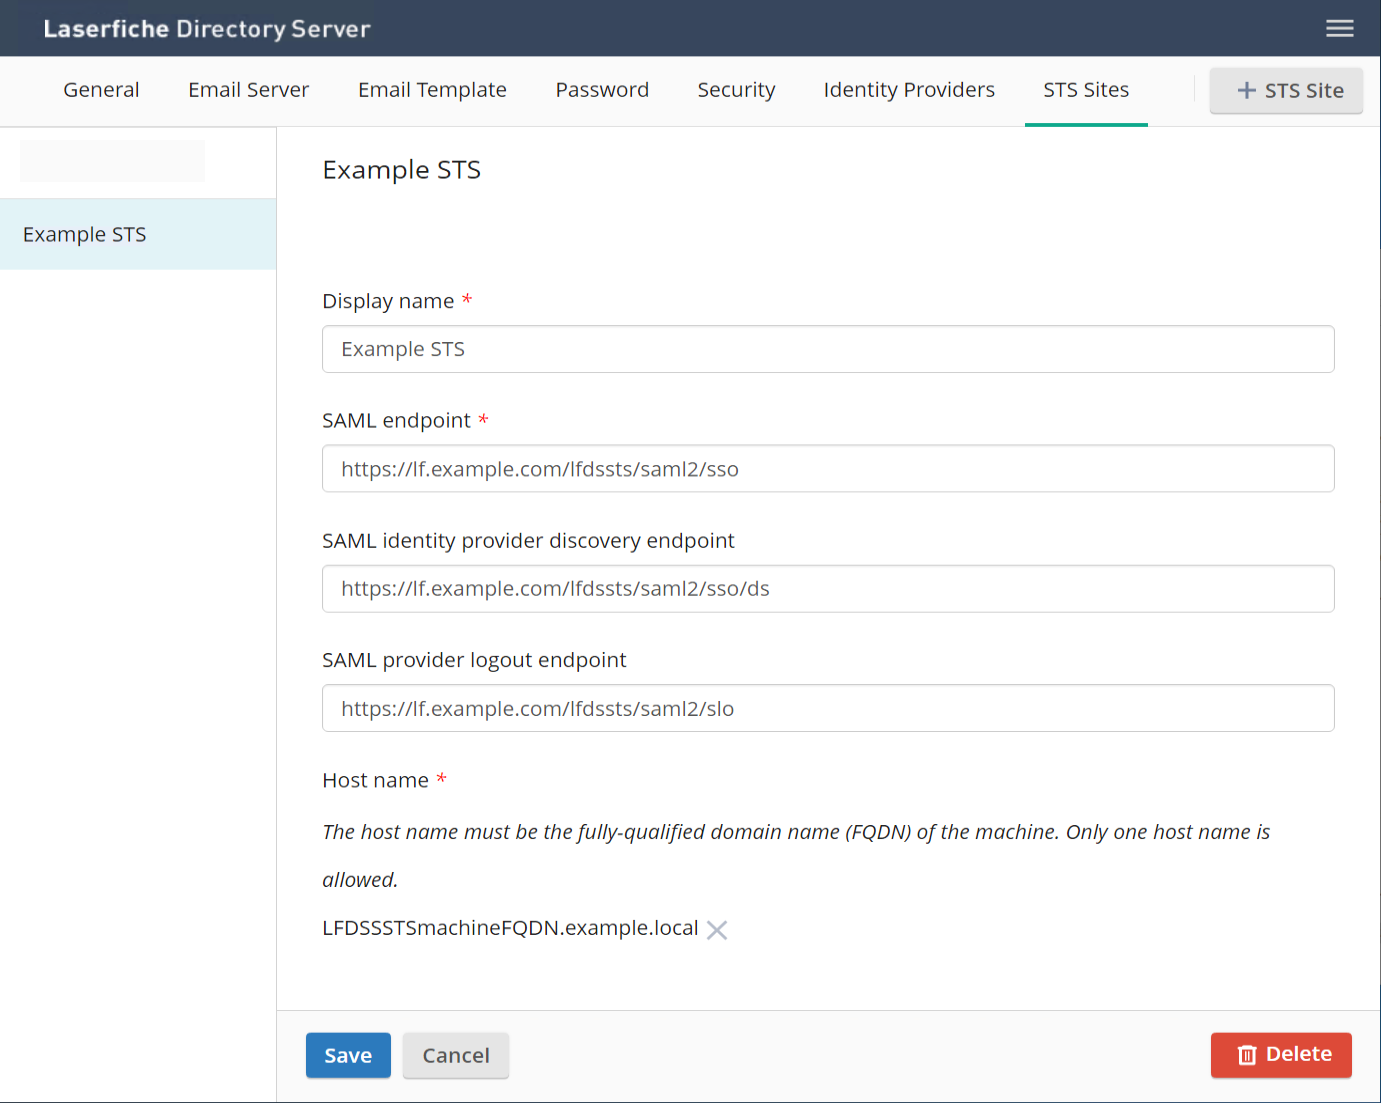
- In LFDS, Configure your STS Site(s) like so:
- In Entra, create an Enterprise Application registration, selecting the "Custom" (non-gallery) option. Call it "Laserfiche Production" or similar according to your naming conventions.
- In the Enterprise App, go to the "Single sign-on" tab under "Manage" and select "SAML"
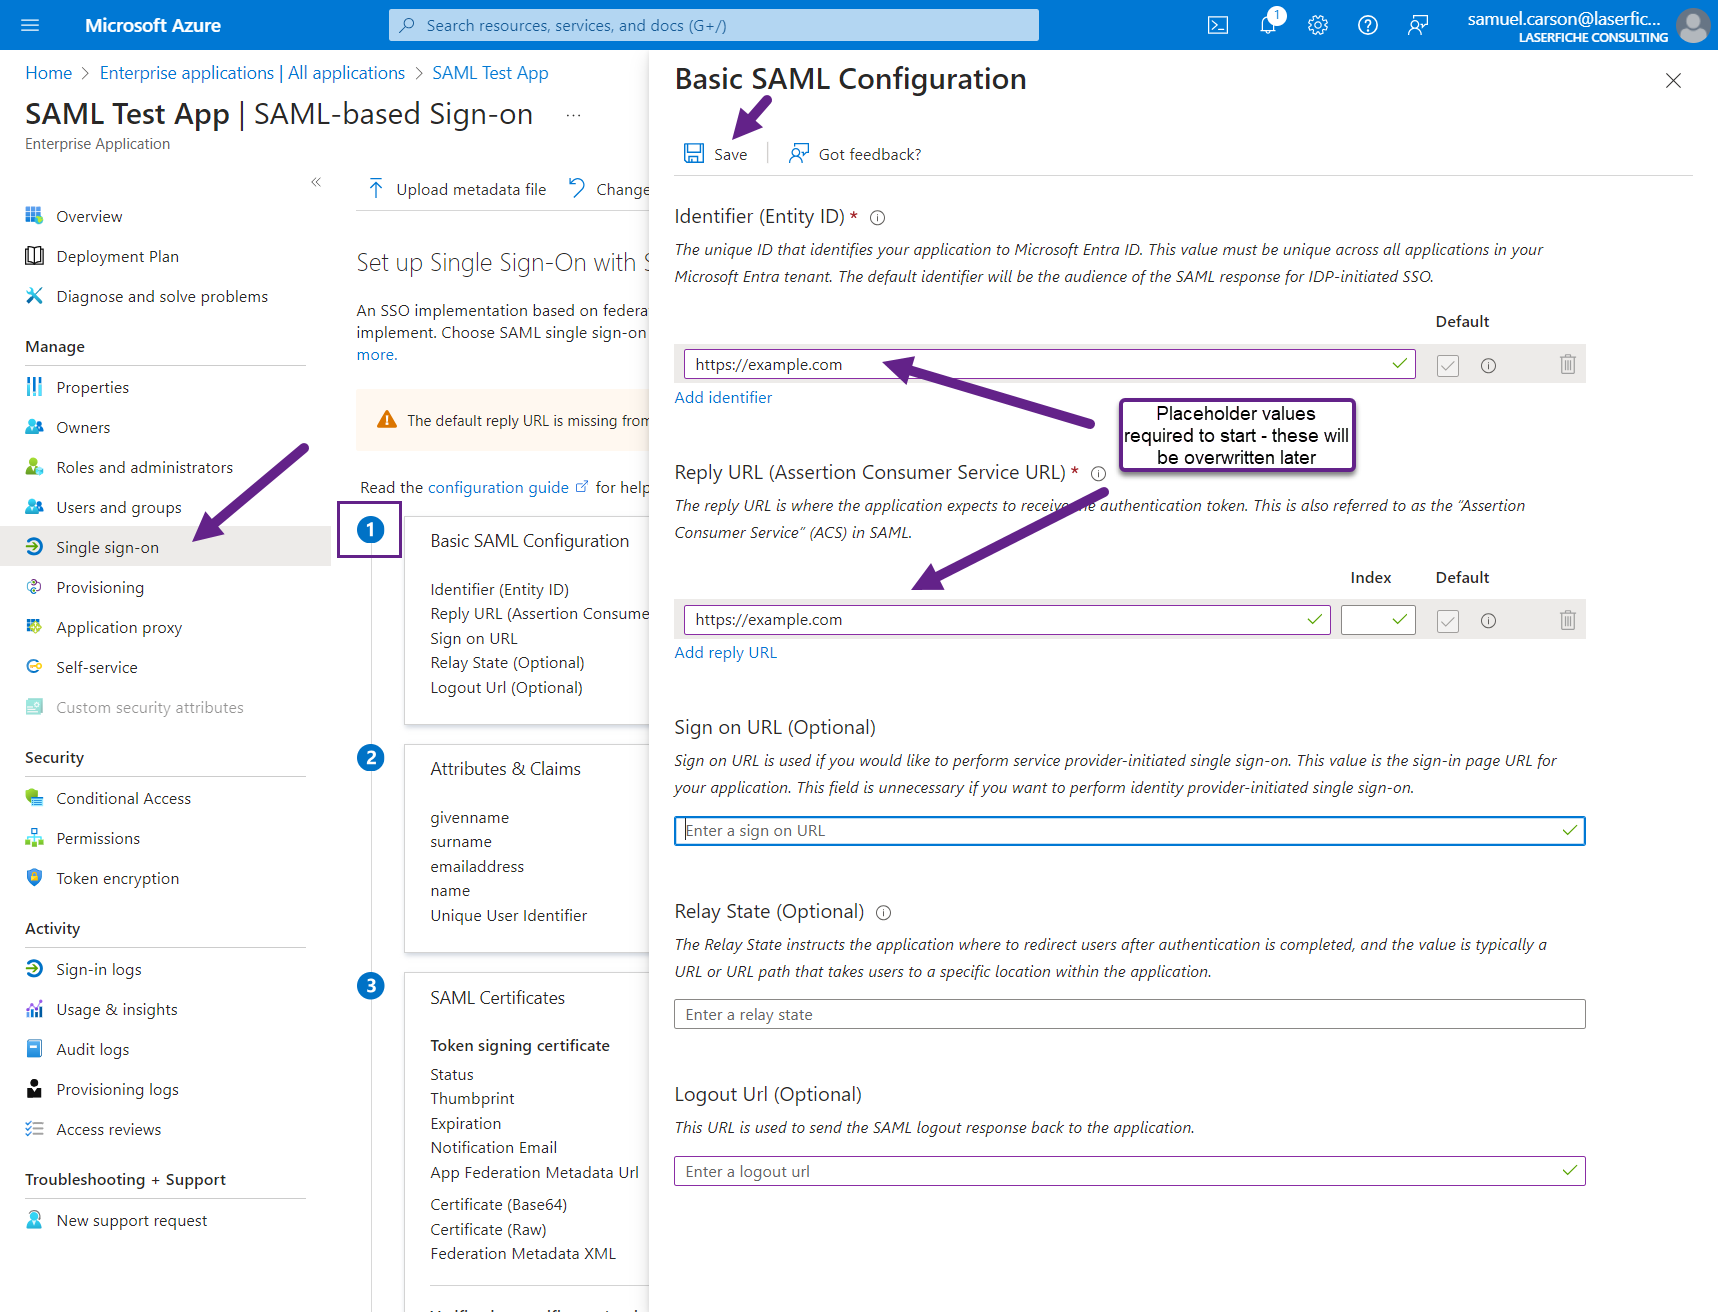
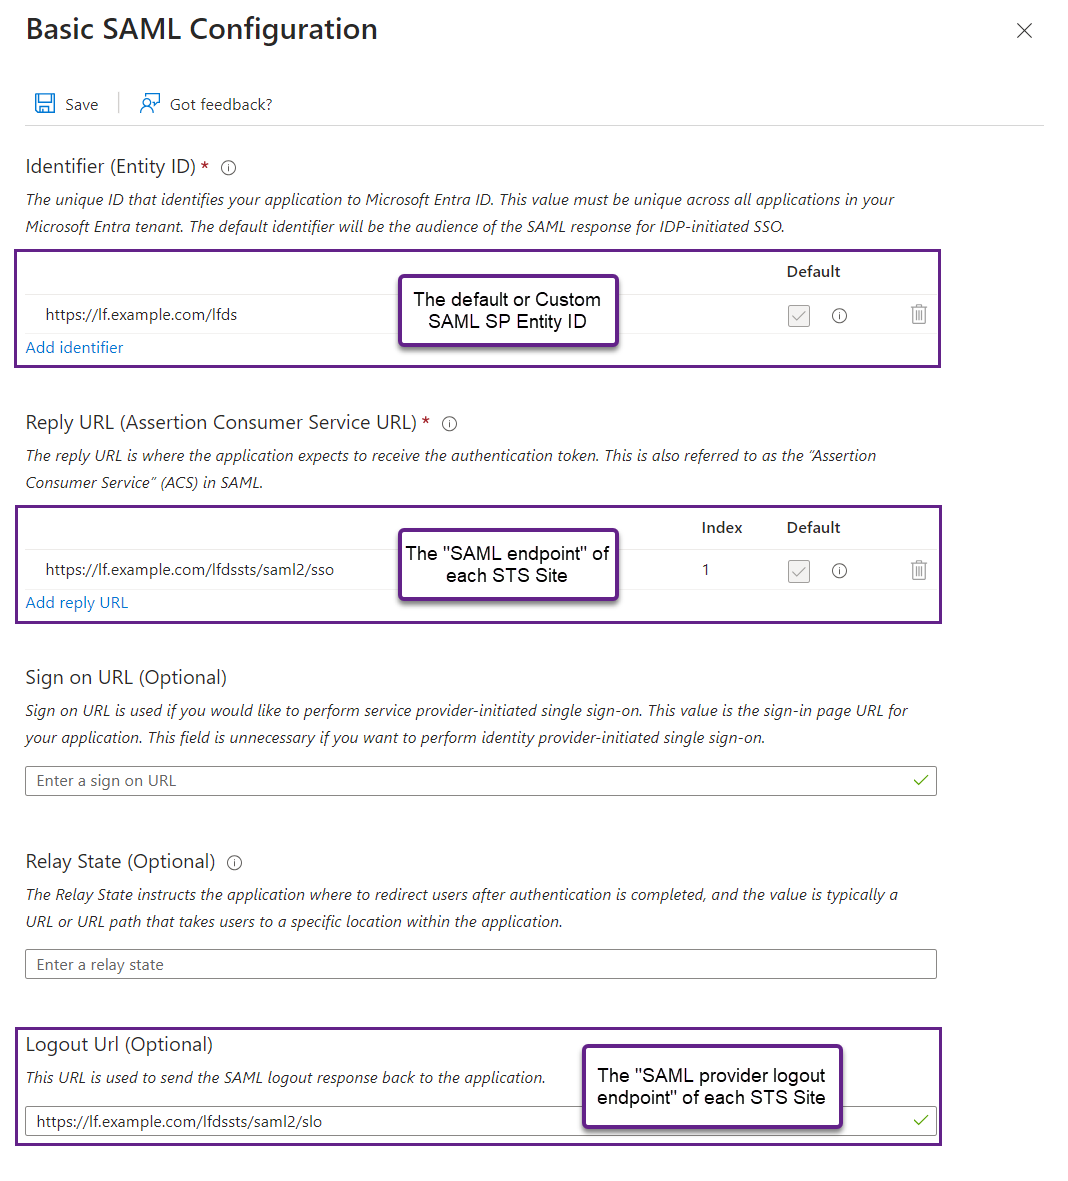
- Edit the first section, "Basic SAML Configuration" and put in the placeholder values of "https://example.com" for the two required fields, "Identifier (Entity ID)" and "Reply URL (Assertion Consumer Service URL)", then Save.
- Edit the 2nd section "Attributes & Claims".
- Select "Add new claim", enter the following values, and Save
- Name: displayname
- Source attribute: user.displayname (pick from dropdown)
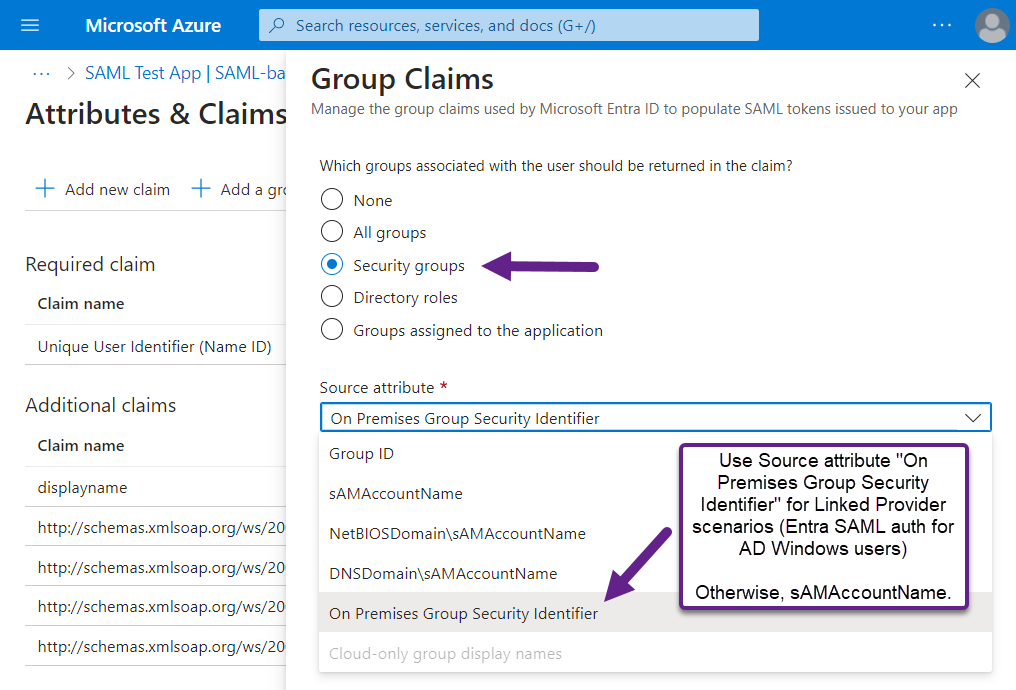
- Select "Add a group claim", enter the following values, and Save
- Select "Security groups" to return, with Source Attribute "On Premises Group Security Identifier" if you have a Linked Provider scenario with Entra SAML logins for AD Windows users, and "sAMAccountName" if you don't.
Important: Active Directory (AD) groups must be included in the SAML token claims or their membership will be ignored by LFDS. Ensure that all relevant AD groups are synchronized to Entra.
"User can't see/do something a group they're in has permissions for" issues are almost always due to that group not making it into the user's SAML auth token claims for whatever reason, so LFDS/Laserfiche doesn't see them as a member. An easy way to test this for repository permission issues is to have the user authenticate with normal Windows authentication (through the Laserfiche Windows Client if the option isn't available for LFDSSTS/Web Client) and try the action. Windows Authentication will include the full group list from AD DS and can help identify differences in behavior vs Entra SAML logins and any associated group claim/sync issues.
Note: Per Microsoft "The number of groups emitted in a token is limited to 150 for SAML assertions". If you have any users with over 150 Entra-sync'd AD groups, Microsoft provides options to restrict which groups are included in the SAML token. You can do this by either (a) assigning specific groups to the Enterprise Application and only sending those, or applying a filter based on group name (e.g., only send groups prefixed with "lf-"). See Microsoft's documentation page for information on those options:Configure group claims for applications by using Microsoft Entra ID
- Afterward, the "Attributes & Claims" section should look like this:
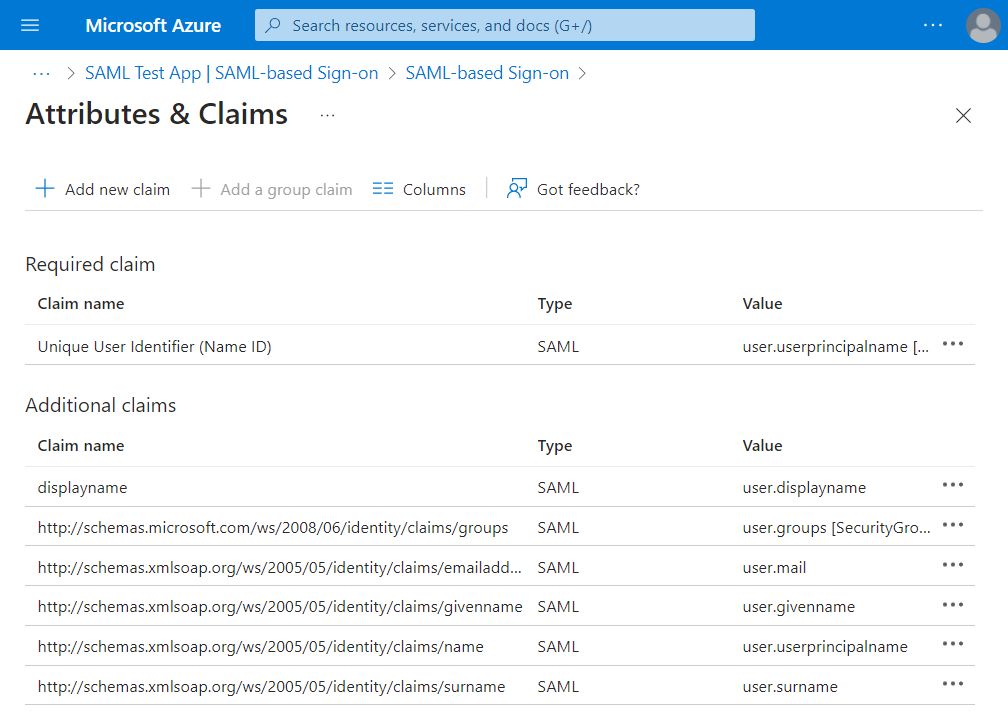
- Note all the "Claim name" values under "Additional claims".
NOT the values under "Value" like "user.mail", which describe the Source Attribute, not the name of the claim that goes into the SAML token. This is the most common place people get claim mapping screwed up, because they put "user.mail", "user.groups" etc. into the LFDS claim mapping and because that's not what's actually in the SAML token, LFDS doesn't find the attribute/claims name values it's trying to map.
- You will need to enter these exactly in the LFDS SAML IDP Claims mapping section. The Entra ID default claim name values with the group claim and the "displayname" one we added are listed below by how they appear in LFDS IDP Claim Mapping.
DO NOT ASSUME THESE VALUES ARE CORRECT. CHECK YOUR OWN ENTRA CONFIGURATION. MICROSOFT HAS CHANGED THE DEFAULT CLAIM NAME VALUES IN THE PAST.
- Email: http://schemas.xmlsoap.org/ws/2005/05/identity/claims/emailaddress
- First Name: http://schemas.xmlsoap.org/ws/2005/05/identity/claims/givenname
- Last Name: http://schemas.xmlsoap.org/ws/2005/05/identity/claims/surname
- Display Name: displayname
- Groups: http://schemas.microsoft.com/ws/2008/06/identity/claims/groups (note the "/2008/06/" is different than the "/2005/05/" in the other claim names)
- Switch to LFDS. We'll come back to Entra in a moment.
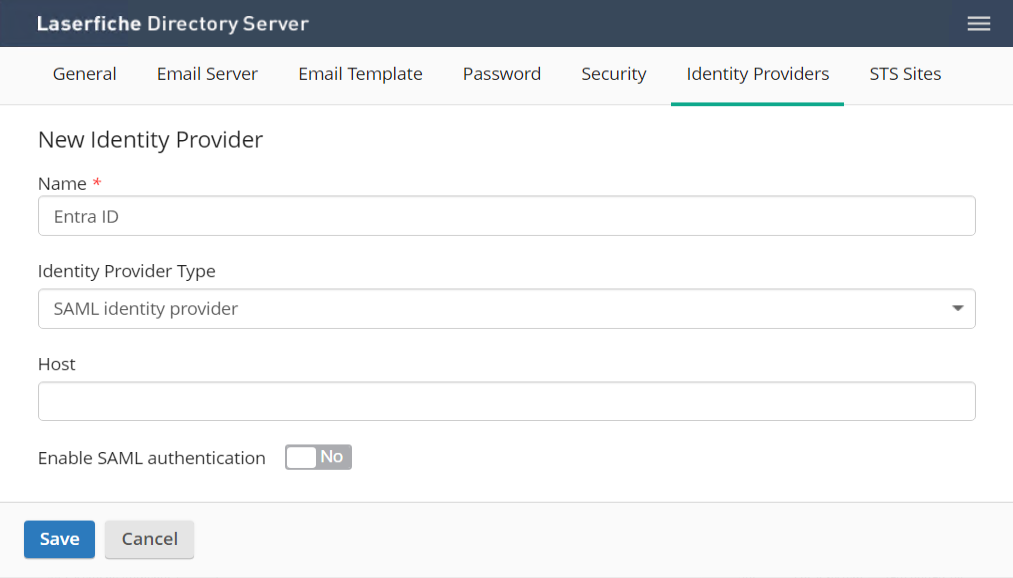
- In LFDS, add a new SAML identity provider, with "Enable SAML authentication" set to "No" for now, and Save.
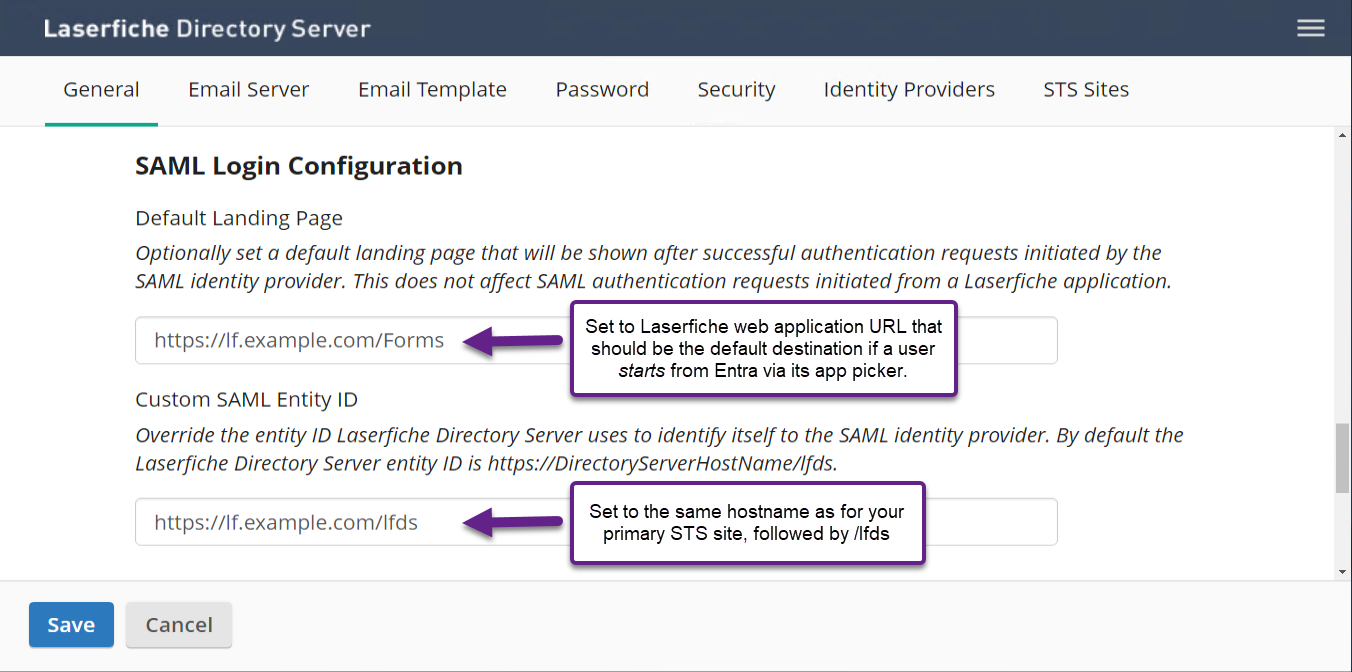
- Recommended: Set a Default Landing Page for "IDP-initiated" SAML SSO to work. This is the Laserfiche web application URL that should be the default destination if a user starts from Entra via its app picker. For example, https://lf.example.com/Forms
- Recommended: Set a Custom SAML Entity ID so your SAML SSO integration doesn't break if you Move Laserfiche Directory Server to a New Server (which would result in the default Entity ID changing). Using the hostname of your primary STS Site with /lfds appended is a good choice, ex. https://lf.example.com/lfds.
Note: If you are Configuring Windows Failover Clustering for Directory Server, this step is required.
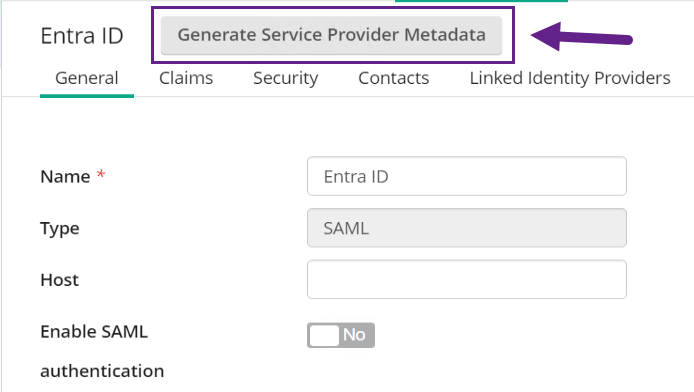
- Select the Entra ID SAML identity provider, and select "Generate Service Provider Metadata"
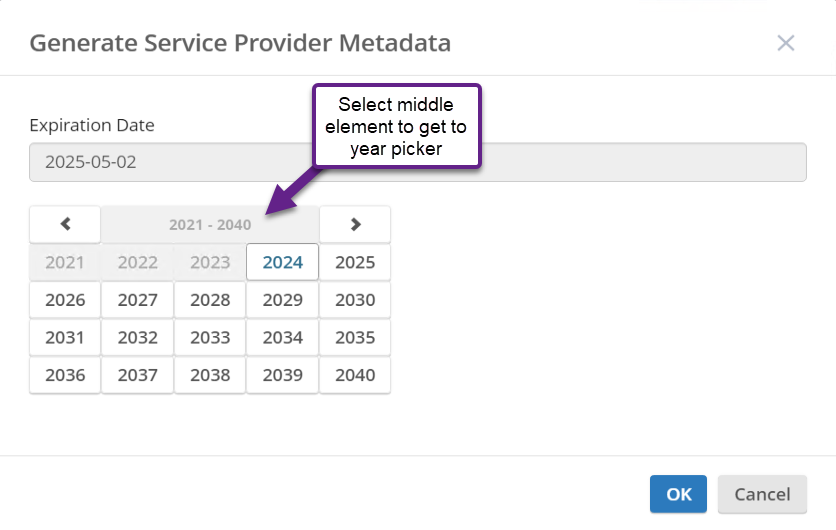
- You'll be presented with a date picker. Select any date at least five years in the future, then select OK.
- This will download a file named "service_provider_LFDS.xml", which contains the SAML Service Provider (SP) Metadata. The contents of the file will look something like this:
<md:EntityDescriptor validUntil="2030-12-01T23:59:59.0000000Z" entityID="https://lf.example.com/lfds" xmlns:md="urn:oasis:names:tc:SAML:2.0:metadata">
	<md:SPSSODescriptor AuthnRequestsSigned="false" WantAssertionsSigned="true" protocolSupportEnumeration="urn:oasis:names:tc:SAML:2.0:protocol">
		<md:Extensions>
			<idpdisc:DiscoveryResponse Binding="urn:oasis:names:tc:SAML:profiles:SSO:idp-discovery-protocol" Location="https://lf.example.com/lfdssts/saml2/sso/ds" index="1" xmlns:idpdisc="urn:oasis:names:tc:SAML:profiles:SSO:idp-discovery-protocol"/>
		</md:Extensions>
		<md:SingleLogoutService Binding="urn:oasis:names:tc:SAML:2.0:bindings:HTTP-POST" Location="https://lf.example.com/lfdssts/saml2/slo"/>
		<md:SingleLogoutService Binding="urn:oasis:names:tc:SAML:2.0:bindings:HTTP-Redirect" Location="https://lf.example.com/lfdssts/saml2/slo"/>
		<md:NameIDFormat>urn:oasis:names:tc:SAML:1.1:nameid-format:unspecified</md:NameIDFormat>
		<md:AssertionConsumerService Binding="urn:oasis:names:tc:SAML:2.0:bindings:HTTP-POST" Location="https://lf.example.com/lfdssts/saml2/sso" index="1"/>
	</md:SPSSODescriptor>
</md:EntityDescriptor>
- Return to the Enterprise Application registration in Entra, go back to "Single sign-on", select "Upload metadata file", and provide the LFDS SP metadata file, and select Add.
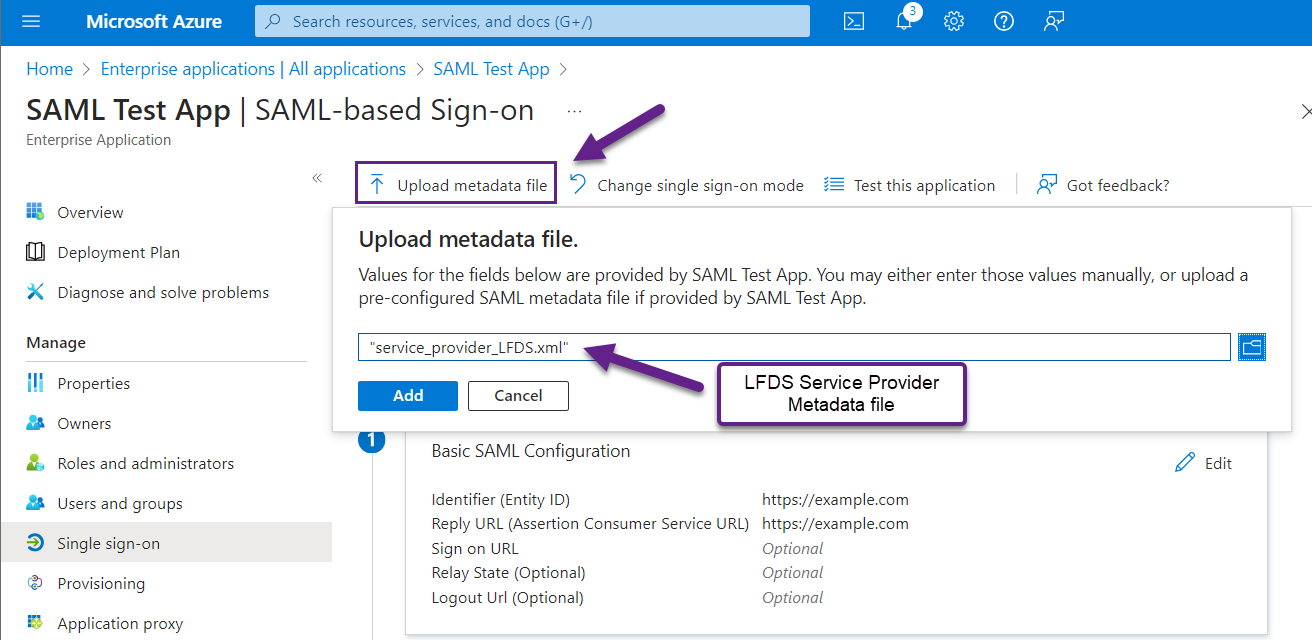
- You'll be taken back to the "Basic SAML Configuration" screen, where the values from the SP metadata file will be auto-filled. Verify the updated values, then Save.
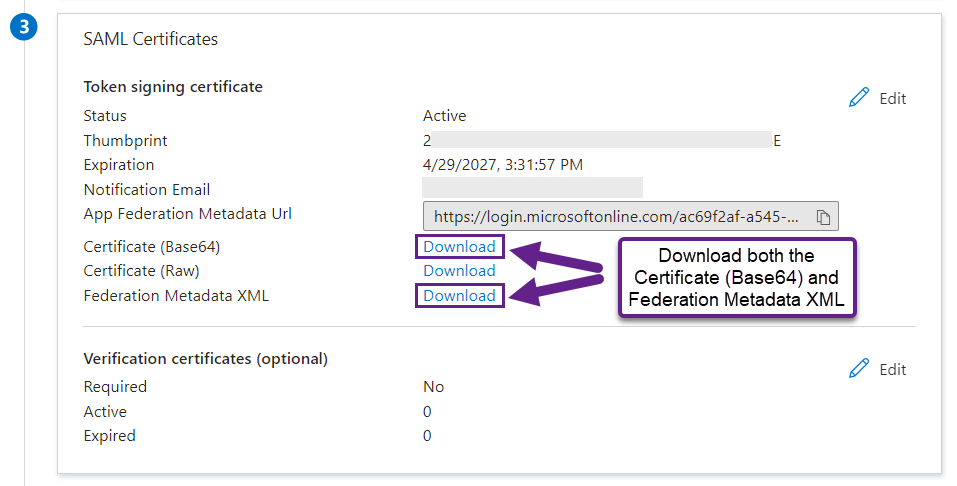
- In the 3rd section "SAML Certificates" there are three download links. Download "Certificate (Base64)" and "Federation Metadata XML" and copy them locally to the LFDS server.
Recommended: Name the Entra Federation (IDP) Metadata XML something like "Entra_SAML_IDP_Metadata_Laserfiche_Production_20240501.xml" as by default it uses the vague "$EnterpriseAppName.xml".
And the certificate something like "Entra_SAML_IDP_Signing_Cert_Laserfiche_Production_20240501.cer"
- At this point we're done with Entra. Switch back to the LFDS server.
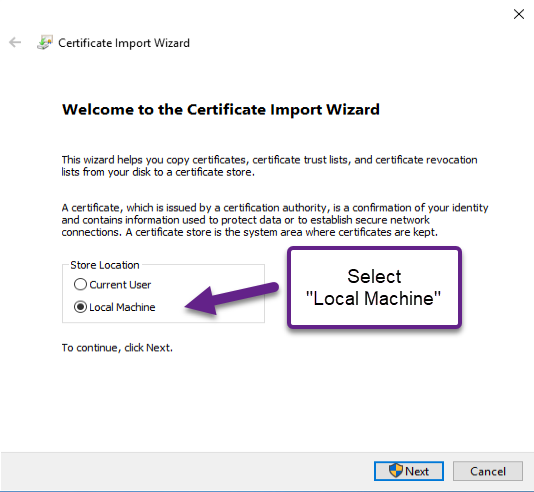
- First, find the Entra IDP Signing Certificate .cer file, select it, right-click / open options, and select "Install Certificate" to launch the Windows Certificate Import Wizard.

- Important: In the Certificate Import Wizard, set the "Store location" to "Local Machine", then select Next.
- Important: On the "Certificate Store" screen, select "Place all certificates in the following store", then Browse, select "Trusted Root Certification Authorities" from the list that pops up, and select Next.
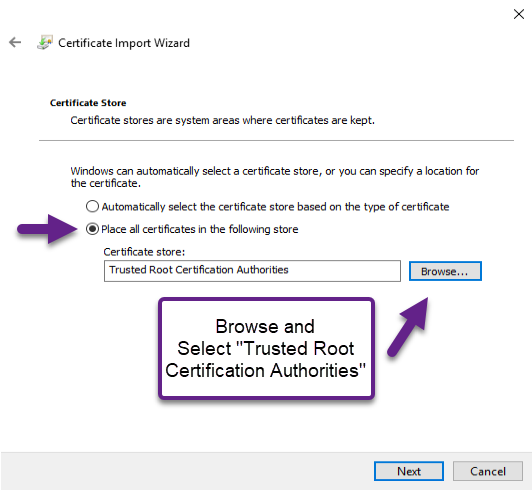
- On the "Completing the Certificate Import Wizard" screen, verify the information and select "Finish" to complete the import.
- Next, return to the LFDS Web Admin interface (https://localhost/LFDS)
- Go to Settings -> Identity Providers -> Entra ID (whatever you named it)
- Toggle "Enable SAML authentication" to "Yes"
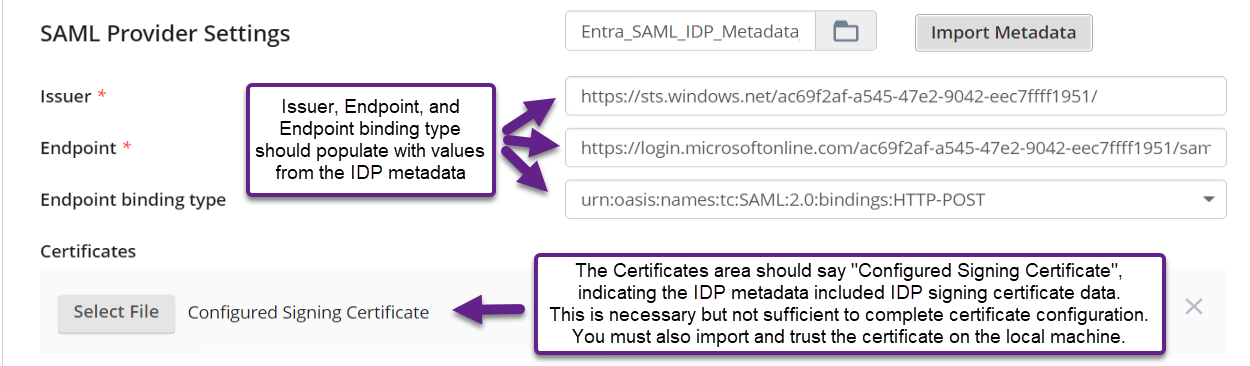
- Next to "SAML Provider Settings" there's a file upload option next to an "Import Metadata" button. Select the Entra IDP Metadata XML file, then select Import Metadata.

- The Issuer, Endpoint, and Endpoint binding type should populate with values from the IDP metadata.
The Certificates area should say "Configured Signing Certificate", indicating the IDP metadata included IDP signing certificate data.
This the second required step for IDP signing certificate configuration. You must also import and trust the certificate on the local machine. If the signing certificate is not trusted by the LFDS machine, SAML authentication will fail.
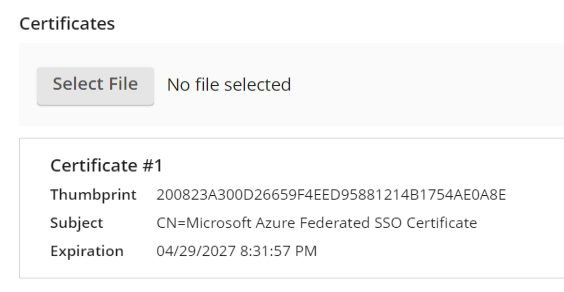
- Scroll down and Save, then return to the Certificates section.
- An entry for "Certificate #1" (if it's the first one you've added) with a Subject like "CN=Microsoft Azure Federated SSO Certificate".
Important: Microsoft currently uses a 3-year expiration for Entra SAML signing certificates. If the certificate expires without a new one being uploaded and trusted, the SAML SSO integration will stop working as LFDS stops trusting the digital signature on the SAML tokens. Document/set notifications about the need to update the Entra SAML signing certificate on both sides at least a month prior to expiration.
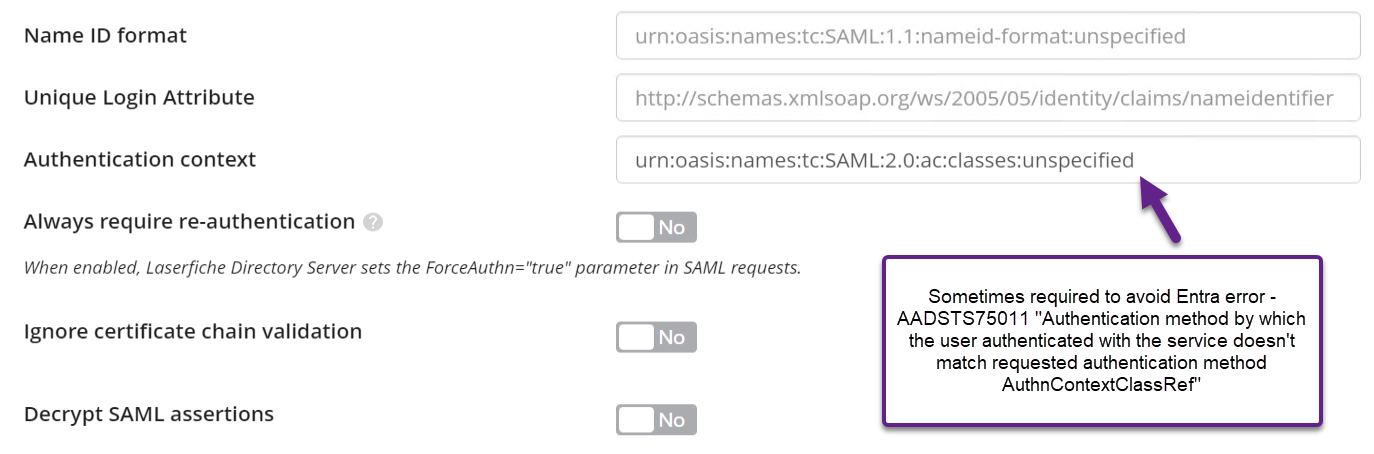
- Update the "Authentication context" value to "urn:oasis:names:tc:SAML:2.0:ac:classes:unspecified".
This addresses Entra Error - AADSTS75011 Authentication method by which the user authenticated with the service doesn't match requested authentication method AuthnContextClassRef. The error can occur in a variety of scenarios where multi-factor authentication (MFA) is enabled in Entra and a user logs into a different application with Entra SSO before Laserfiche.
- Optionally set "Always require re-authentication" to "Yes". See the Directory Server Configuring Single Sign-on (SSO) with SAML Authentication for more information and an important note on this option.
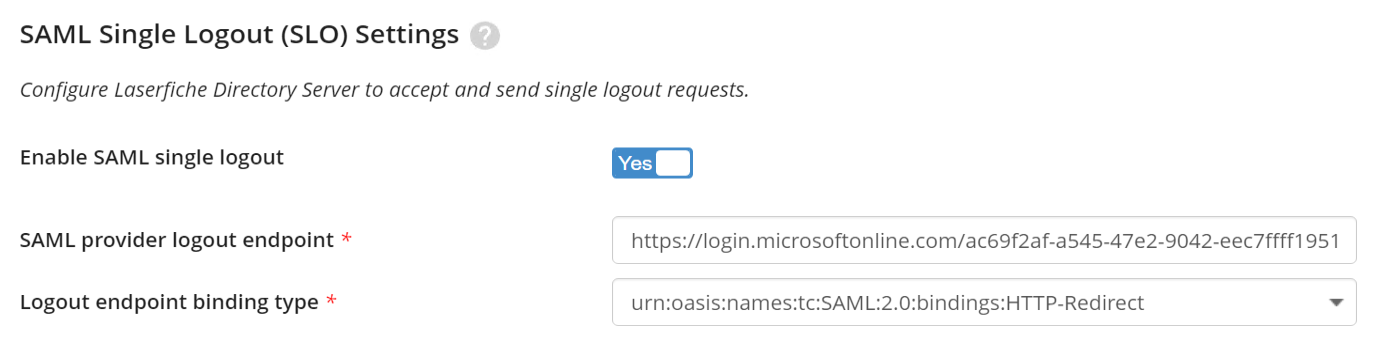
- Optionally Enable SAML single logout (SLO). We recommend enabling SLO so unless you have a compelling reason not to.
Once Enabled, the "SAML provider logout endpoint" and "Logout endpoint binding type" values should be automatically populated with values from the Entra IDP Metadata.
- Configuring Request Signing is not necessary for a working SAML SSO integration and outside the scope of this guide. Please see the documentation for details.
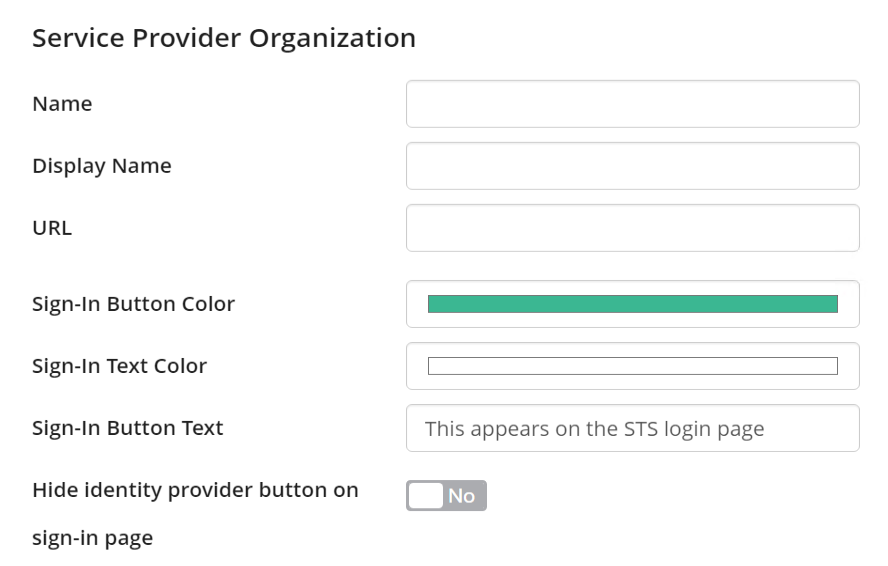
- In the "Service Provider Organization" section, you can optionally customize how the Entra identity provider button appears on the LFDSSTS login page. If you do not provide custom "Sign-In Button Text", the default is the name of the Identity Provider in LFDS ("Entra ID" in this examples so far).
You may want to make the Sign-In Button Color something closer to "Microsoft Blue" to aid user recognition. The Entra ID sign in button color Microsoft uses is:
rgb: 0,100,181
hex: 0064b5
- Save.
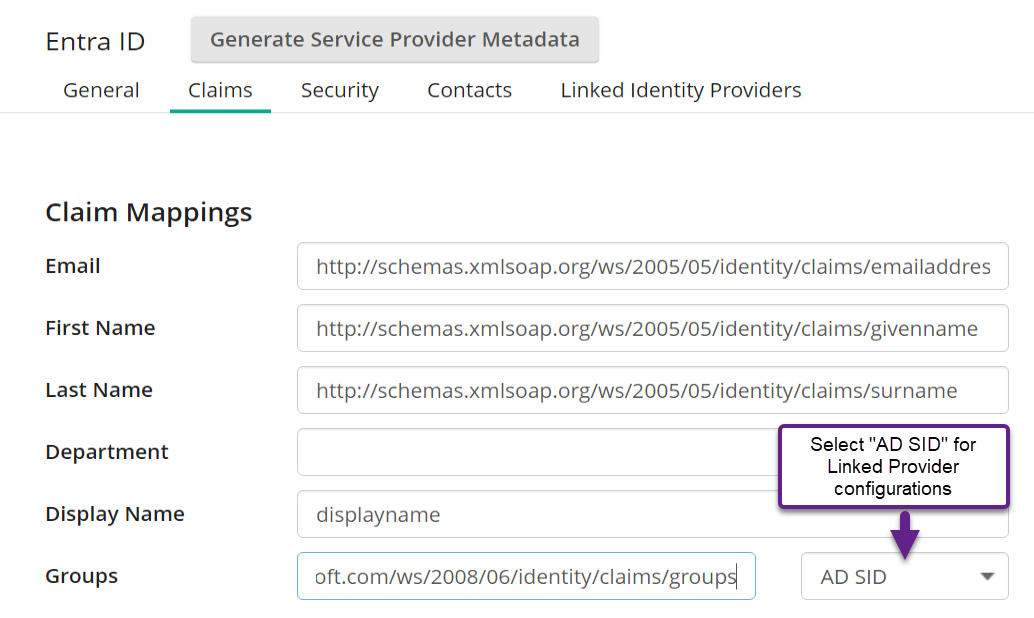
- Navigate to the Claims tab of the identity provider
- In the Claim Mappings section, enter the Claim Name values from Entra's "Attributes & Claims" section. If you are configuring Entra ID as a Linked Identity Provider for Active Directory, set the Groups claim format to "AD SID", otherwise leave it at "Unspecified (Default)". Save.
- If configuring as a Linked Identity Provider, navigate to the Linked Identity Providers tab and select "Add Linked Identity Provider".
- Select an AD identity provider (domain) from the Identity Provider dropdown list.
- The Identifying Attribute must be the Claim Name of the Entra Additional Claim containing the User Principal Name (UPN) (Source Attribute "user.userprincipalname"). By default, the Claim Name is "http://schemas.xmlsoap.org/ws/2005/05/identity/claims/name"
- Select "UPN" as the Attribute Format"
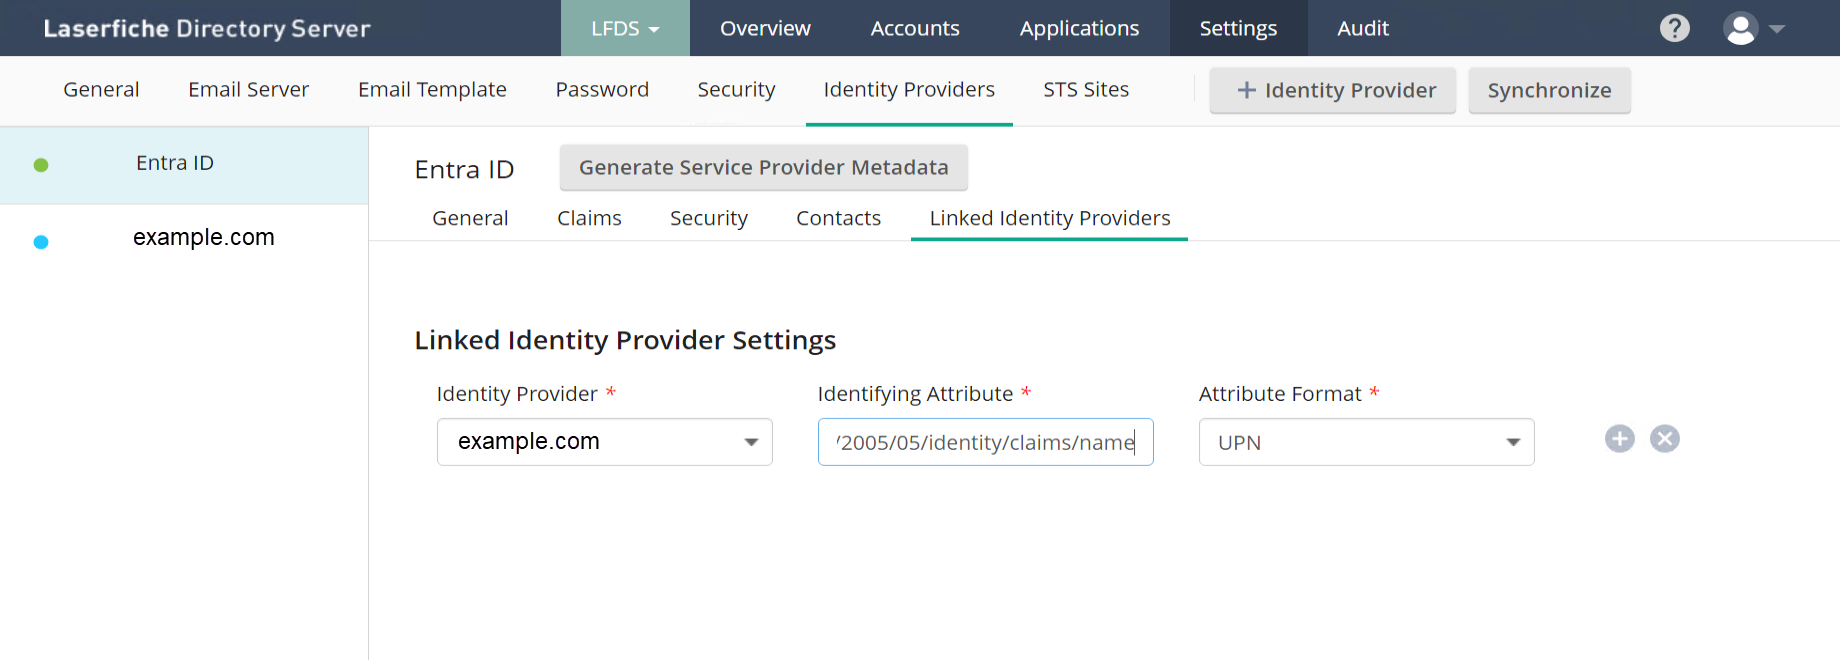
- Optional: The Linked Identity Providers feature allows linking multiple Active Directory (or LDAP) identity providers to the same SAML identity provider. If you have multiple AD identity providers (domains) registered in Directory Server and synchronized to the same Entra tenant, you can add the other AD IDPs by selecting the "+" button on the right. This will add another row, where you select the next AD IDP and provide the same Identifying Attribute and Attribute Format as before.
- Save.
- If you Enabled SAML single logout (and are on LFDS 11 Update 5 or above):
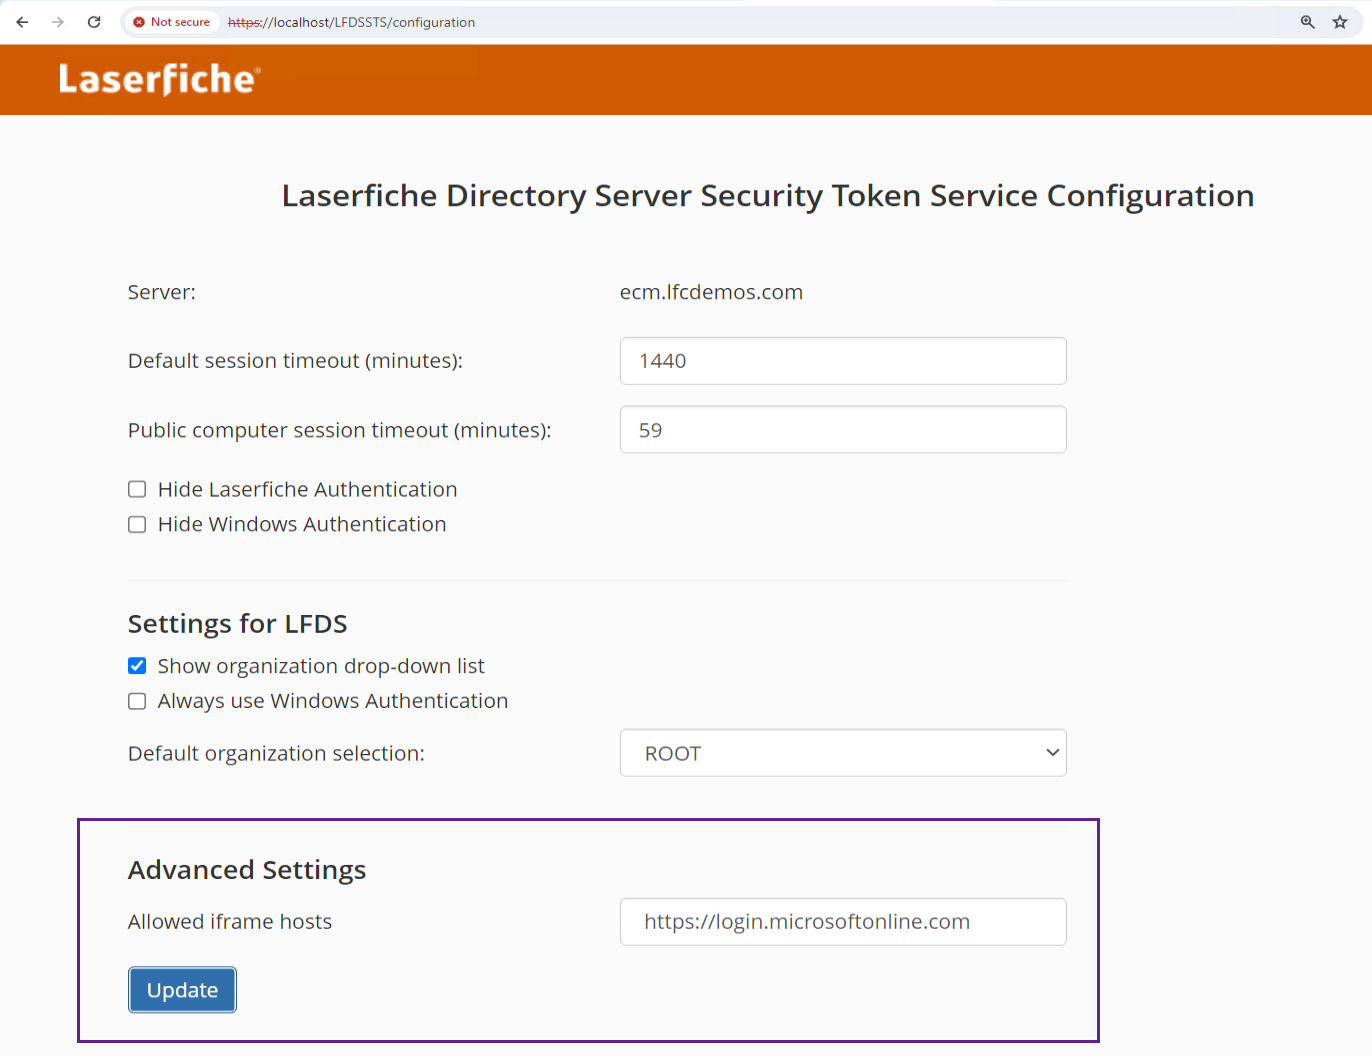
On the computer hosting the Directory Server Security Token Service (STS), open the STS configuration site, by default, the address is: https://localhost/LFDSSTS/configuration
- Add the domain of the Entra SAML SLO endpoint for your identity provider to the list of Allowed iframe hosts.
- For example, for a Microsoft Entra ID sample endpoint of https://login.microsoftonline.com/{guid}/saml2, add https://login.microsoftonline.com to the "Allowed iframe hosts" list. Don't assume this example is correct - check your actual Entra SLO URL.
- Test SAML SSO by:
- Open an Incognito / InPrivate browser window and opening DevTools -> Network tab (make sure "Preserve log" is checked)
- Navigate to an Laserfiche web application with LFDSSTS SSO enabled, e.g., https://lf.example.com/Forms
- You should be redirected to your LFDSSTS auth page and see the new "Entra ID" option (or whatever custom text you set)
- Select "Entra ID"
- Be redirected to Entra for authentication
- Authenticate to Entra
- Be redirected back to the LFDSSTS SAML ACS URL endpoint, e.g., https://lf.example.com/lfdssts/saml2/sso (the SAML Response is in this call if you need it for troubleshooting), then automatically redirected and authenticated to the originally requested Laserfiche web application (https://lf.example.com/Forms)
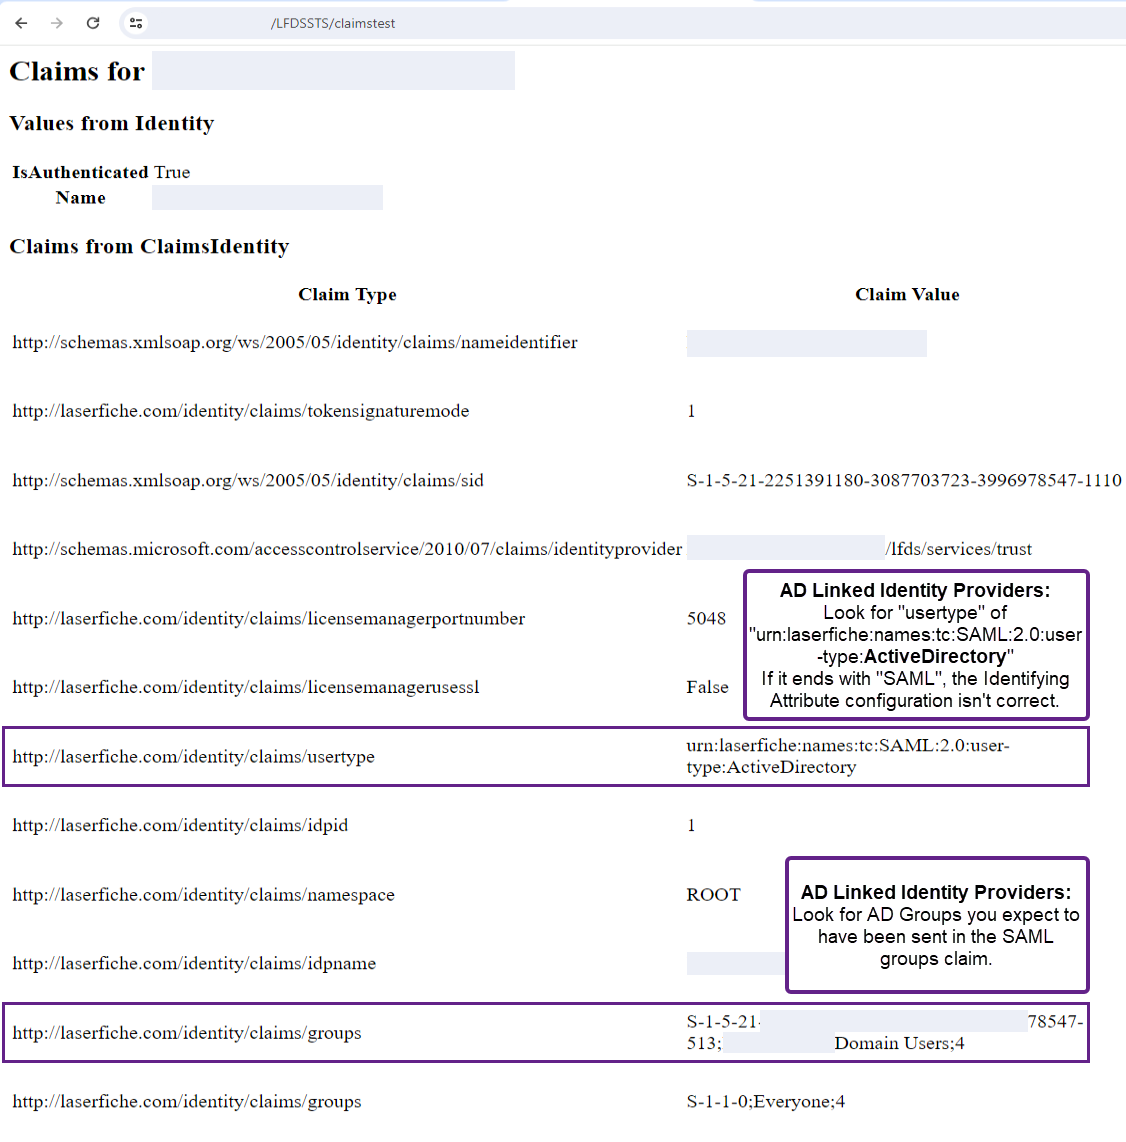
- Open a new tab in the same browser window and navigate to https://lf.example.com/lfdssts/claimstest (using your own LFDSSTS URL). This shows the contents of the LFDS auth token's claims, generated on the basis of the SAML Response and the claims LFDS mapped from it.
- If a Linked Identity Provider is configured:
- Look for a "http://laserfiche.com/identity/claims/usertype" claim value of "urn:laserfiche:names:tc:SAML:2.0:user-type:ActiveDirectory".
If it ends with "SAML", the Identifying Attribute configuration isn't correct.
- Look for AD Groups you expect to have been sent in the SAML groups claim. They'll appear under the Claim Type "http://laserfiche.com/identity/claims/groups" with values like "S-1-5-21-123456789-987654321-123456789-123;DOMAIN\Domain Users;4"
- Use onelogin's wonderful free SAML Developer Tools website to help with troubleshooting if needed.
https://www.samltool.com/online_tools.php
There you go. Easy.
I realize that's a lot of steps but it's not as bad as it looks. Full Entra SAML SSO configuration usually takes me about 30 minutes start to finish these days.