You are viewing limited content. For full access, please sign in.

Question

Question

Viewing a Form attachment in LF client?

asked on January 27, 2016 Show version history

Hi,


When we are receiving a completed form back in our office in LF Clients section for review we are having difficulties viewing the attachment put in the form by the individual who filled out the form.


In the Form design I simply used the 'Upload' file/image field and in the Workflow for when the form comes into us here at the office the form is received as a TIFF file. In the LF Clients Section I can only see the image attachment name but not the image itself? (see attached screenshot) 


Is the attachment somewhere in LF Clients I am missing? or is the issue the form being received here in TIFF format?


Many thanks,


Christian

image issue.JPG
image issue.JPG (30.24 KB)
0 0

Replies

replied on January 27, 2016 Show version history

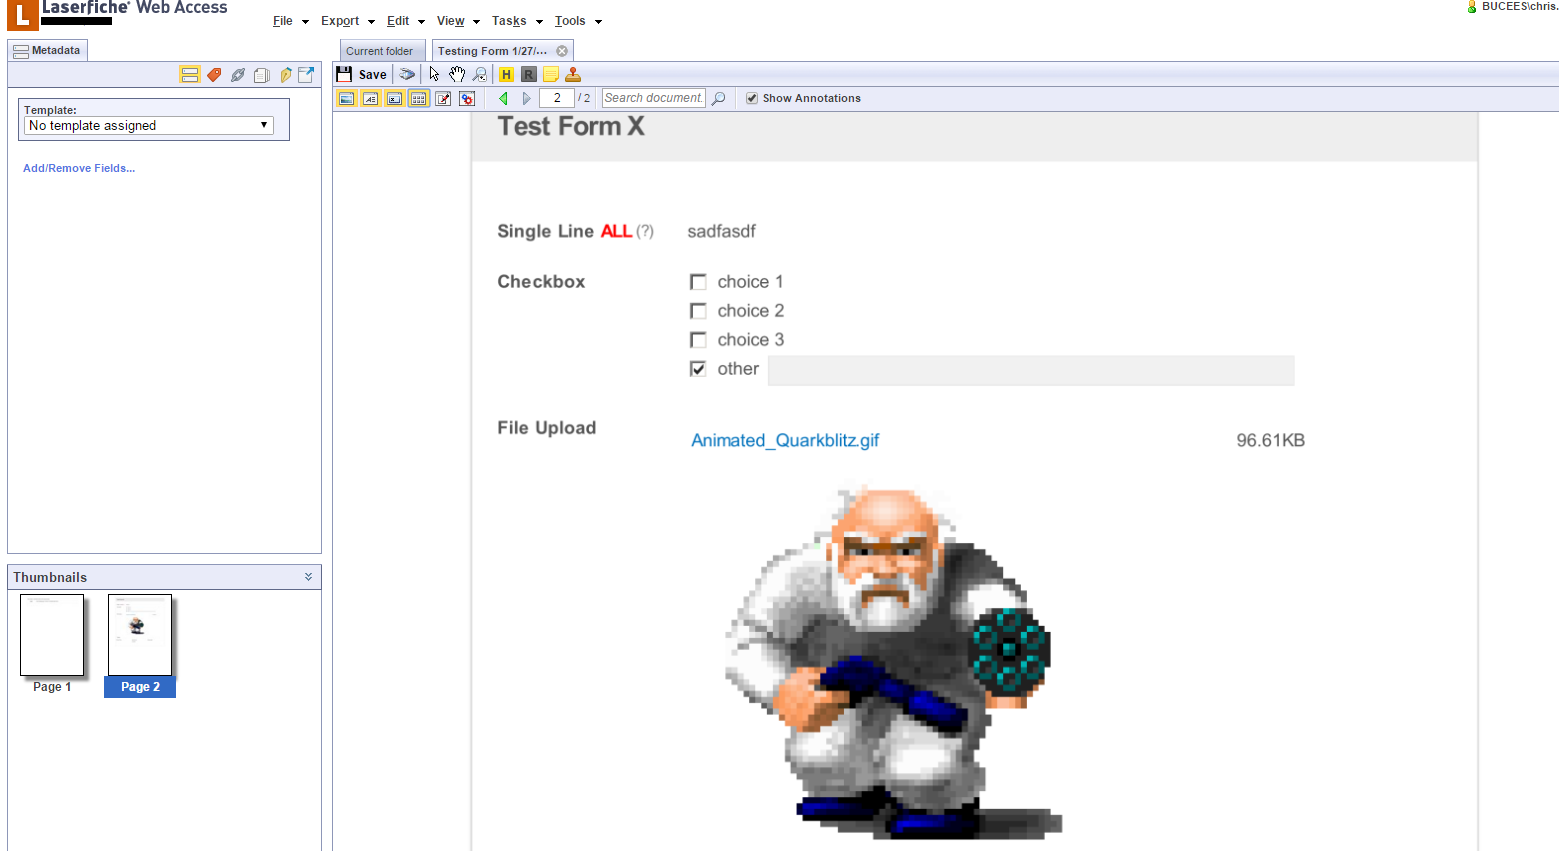
In the "Save to Repository" task there is a tab that will show up if you have a "file upload" control on the form. In here there are various options to save the attachment to the repository and link it to the parent. This works great for most purposes, but can be a bit cumbersome to navigate in Laserfiche. An alternative is to show the attachments in the form inline as shown below. (Only works with actual image types such as png,bmp,jpg, and gif. Theoretically, you could also make it work with pdf and word uploads, but will take a little more work.)

There are a few modifications you will need to do first though. First and foremost, add this script to your "CSS and Javascript" section (courtesy of Winfong Lee):

$(document).ready(function () {
    var iml = ['jpg','jpeg','gif','png'];
    $('.files tbody tr').each(function() {
      if ($(this).find('a').length && $.inArray($(this).find('a').attr('title').match(/\.(\w{3,4})$/)[1],iml)>-1) {
        var ims = $(this).find('a').attr('href'),
            imr = $('<img style="width:300px;" />');
        imr.attr('src',ims);
        $('<tr><td colspan=3>'+imr.prop('outerHTML')+'</td></tr>').insertAfter($(this).find('a').closest('tr'));
      }
    });
});

This script will load any uploaded images on subsequent forms below the name as shown in the screenshot above. Now to get them to show up in the repository you will have to modify a specific js file in your Laserfiche installation directory. Open your file explorer and navigate to your Laserfiche Forms installation directory and navigate to the "js\form" folder (should be c:\program files\Laserfiche\Laserfiche Forms\Forms\js\form). Open the "printForm.js" file and paste the following code into it (make sure and make a copy of the file first):

$(function(){$(".cf-section-block>.collapsible.collapsed").each(function(){if(window.isPrintMode){$(this).next().show();$(this).toggleClass("collapsed");}});$.ConvertFieldsReadonly=function(){$(":input[name^=Field][type='text'],[type='number'],[type='email']").not(".calendar").each(function(){if(!shouldMakeReadOnly($(this)))
return;var fieldType=$(this).attr('type');var v=$('<div/>').text(fieldType=="number"?$(this).attr('data-val'):$(this).val()).html();var eid="id='"+$(this).attr('id')+"'"+" type='"+fieldType+"'";var cf=$(this).attr("currencyformat");if(cf){eid+="currencyformat='"+cf+"'";}
var link=v;if(!window.isPrintMode){link=LF.utils.GenerateLink(v);}
if(window.isPrintMode){$(this).parent().width($(this).parent().innerWidth());}
$(this).parent().css("word-wrap","break-word");var new1=$("<div class='ro' "+eid+" >"+link+"</div>");if(cf){new1.css("display","inline-block");}
else{setWidthPrintItem($(this)[0].className.split(/\s+/),new1);}
$(this).replaceWith(new1);});$(":input[name^=Field][type='text'].calendar").each(function(){if(!shouldMakeReadOnly($(this)))
return;var v=$('<div/>').text($(this).val()).html();if(window.isPrintMode){$(this).parent().width($(this).parent().innerWidth());}
$(this).parent().css("word-wrap","break-word");var new1=$("<span class='ro'>"+v+"</span>");$(this).replaceWith(new1);});$("textarea[name^=Field]").each(function(){if(!shouldMakeReadOnly($(this)))
return;var eid="id='"+$(this).attr('id')+"'"+" type='textarea'";var v=$(this).val();v=$('<div/>').text(v).html().replace(/\n/g,"<br>");var link=v;if(!window.isPrintMode){var link=LF.utils.GenerateLink(v);}
var new1=$("<div class='ro' style = 'word-wrap: break-word'  "+eid+" >"+link+"</div>");setWidthPrintItem($(this)[0].className.split(/\s+/),new1);$(this).replaceWith(new1);});$("input[name^=Field][type='checkbox'],[type='radio']").each(function(){if(!shouldMakeReadOnly($(this)))
return;$(this).attr('disabled','disabled');});$("select").each(function(){if(!shouldMakeReadOnly($(this)))
return;var t=$(this).find("option:selected").text();if(window.isPrintMode){$(this).parent().width($(this).parent().innerWidth());}
$(this).parent().css("word-wrap","break-word");var eid="id='"+$(this).attr('id')+"'"+" type='select'";var new1=$("<div class='ro' "+eid+" >"+t+"</div>");setWidthPrintItem($(this)[0].className.split(/\s+/),new1);$(this).replaceWith(new1);});if($("input[name=IsLocked]").val()=="True")
{$(".ui-datepicker-trigger, .form-del-field, .form-add-field").remove();$('.form-dup-field, .form-del-field').addClass('disabled');}
function setWidthPrintItem(classes,newItem){$.each(classes,function(index,item){if(item==='cf-xlarge'||item==='cf-large'||item==='cf-medium'||item==='cf-small'){newItem.addClass(item);return false;}});};function shouldMakeReadOnly(ele){return($("input[name=IsLocked]").val()=="True"&&!LF.isLessThenIE8);};}});

Now save it and try submitting a form. You can control the size of the images by modifying the width attribute of the img element. It is set to 300px by default.

6 0
replied on October 14, 2016

Hi Chris

We tried this solution and it works great for showing the picture on the form and in the saved form in the repository. The challenge we have is that we need to make the photos larger on the form, so we increased the size to 600px in the Forms JS Code as per your notes, but the image would be cut off. I added CSS for the File Upload to increase the size of the Upload field and now it displays correctly on the form preview when submitted, but the photos are cut off on the Form that is saved in the repository.


When the form is printed to the repository is still seems to be restricted to the 300px width as regardless of how big I mage the photos they always get cut off at the same place. We are wondering if you have experienced this issue, and if so how you resolved it.

Thanks

Steve

0 0
replied on January 16, 2017

Hello Chris,


I try this solution and works very well for a while, but now for some time it doesnt work anymore, we didnt change anything the JS just stop working. 

I check alll the process over and aver again, and aparently everything its as in this post, So, its there the posibility of an laserfiche update, windows update or something that prevent the process to work?


We try with  3 diferent laserfiche servers with no conections between then, diferent implemantation, and do not work in any of them.


Thanks for your help.


0 0
replied on June 29, 2017

This worked great for me, thanks for the tip!

0 0
replied on October 23, 2017

Hi all

We've noticed since applying the Forms 10.2 Update 2 patch that this has stopped working. Still working through it to understand where the issue is.

0 0
replied on October 24, 2017

Steve, thanks for the heads up.  Keep us posted.  Update 2 looks like it has some good fixes in it but I can't risk breaking our image previews.

0 0
replied on October 24, 2017

Hi Alon

I don't believe it would be that simple as there would likely be some duplication of commands which could produce unexpected results. Anything tried will definitely need to be tested.

0 0
replied on October 24, 2017

Steve,

Maybe I am missing something?  But the first time someone does this they are just pasting that new code to the bottom of the printform.js.  So if an update overwrites that .js the new code is gone.  Pasting it in again should not create any duplication of commands?  But yes, of course it would need tested :)   Also, I think it is safe to assume that the .js was overwritten as part of the update because of some change to it (either new functionality or a bug fix).  So it is also safe to assume that if you revert back to a backup from an earlier version of Forms you are losing those changes.

0 0
replied on October 24, 2017

I can confirm that with the forms 10.2 update the images are no more showing as expected

0 0
replied on October 24, 2017

I have found that the issue is caused by the printform.js file in C:\Program Files\Laserfiche\Laserfiche Forms\Forms\js\form has been overridden by the update. I replaced that file with the version I had previous to the update and it worked again. (Remember this file was changed as per the notes above).

I have no knowledge of how this may affect other functionality of 10.2 that may have been written into the new printform file. I guess that will take time to figure out.

0 0
replied on October 24, 2017

Thanks Steve!  If you were to just paste the 'custom' code from the original instructions into the printform.js wouldn't that be better?  You wouldn't be erasing any functionality from the 10.2 update that way and that should still fix the issue?

0 0
replied on October 24, 2017

Hi Alon

The code provided above was to replace the existing code, not added to it. At least that is how I deployed it.

0 0
replied on October 24, 2017

Kevin,

The instructions read, "Open the "printForm.js" file and paste the following code into it (make sure and make a copy of the file first):"  That is adding to it, right?  Not replacing it?  I don't see any instructions indicating replacing.  But please correct me if I am wrong.

0 0
replied on October 24, 2017

We have observed that if multiple images are uploaded from the mobile client the images don't stay in the order that they were selected in.  I haven't been able to determine what order they are in yet.  Does anyone have any insight into this?

0 0
You are not allowed to follow up in this post.

Sign in to reply to this post.