Ok, so I finally got this thing working. I will post a guide here which could be expanded to do lots of other stuff with the Google API, but this comes with a few caveats:
1) Getting this to work is hard. Not just tricky, but downright complicated, because the Google API is extremely complicated (especially for server-to-server communication; that is, API access that does not involve active user input, and especially if you choose to not use the Google libraries, which we won't here, to make it as "out of the box" as we can).
2) This is not strictly "out of the box" because it requires writing some Scripting. But it does not require any library that is not in WF. You can do this with your default WF installation.
3) This requires a ton of configuration outside of WF, mostly in your Google account. You should not attempt to do this stuff without having some IT expertise because making big errors here might compromise your Google account. This is a drawback when working with security. Make sure you are quite confident about each of these steps because some of them may be iffy in certain IT environments.
4) You're doing this at your own risk (I have to save my hide in case stuff doesn't go as planned ;))
So I'll basically post this tutorial for the sake of posterity. That is, for people to reference in the future since this type of integration can be quite useful! Feel free to replace steps as necessary. Remember, this setup is not easy =). Let's get to it!
-------------
Step 1: Setup a Service Account in Google
For this step, and any Google-specific stuff, you might need to reference their guides for more details. The first step is to go to the Google Developer Console for your Google account. Under APIs & auth, click Credentials. Under OAuth, click "Create a new Client ID". Select "Service account" and click Create Client ID.
Now you have a Service Account. See the "Email Address" field on it? The one ending with "@developer.gserviceaccount.com"? You will need that soon, so keep track of it. Click on "Generate new P12 key" on the bottom. This will download a .P12 file. This is your signing certificate, which has a private key that will be used to give Workflow rights to talk to your Google API. It will also generate a "Certificate Fingerprint" item for this Service Account; write that one down too, as we'll need it as well.
This is actually it for the Service Account, surprisingly.
Step 2: Expose the API you want
For my example I'll just expose the Calendar API. In the Google Developers Console, once again find APIs & auth and select APIs this time. Click on Calendar API and toggle the big switch on the top. I think this is all you need for enabling it. There are various other places where you can do this... such as within "Explore this API" or in the OAuth playground:
https://developers.google.com/oauthplayground/
You can also use the playground to explore the APIs and what they can do. Very nifty!
Step 3: Import the Signing Certificate
This is where things get a bit crazy. Remember the .P12 file we downloaded in Step 1? Well, you need to import that file into your certificate store. We'll import it into Personal in Local Machine. If you have no idea what I'm talking about, then this is where I strongly suggest that you come back with your local IT guy before going further, because these are steps you do not want to make mistakes in.
You will also need to give the Workflow Server user the rights to access the private key for this certificate (that is, whatever account is running the Workflow Service). Be careful here though; this allows that account (and Workflow) to access your Google API (though I believe you can fine-tune what access is given to this Service Account from Google). Don't be too generous on the access rights you choose to give out here. Remember, "at your own risk" =). This is where the IT person may want to step in and make sure everything is being done correctly.
Step 4: The Workflow: Initial Setup
Finally, we get to the Workflow ~
I will build a Workflow that opens the Google Calendar API and gathers any events that are occurring at a time after "right now". Sounds easy? It's not. Sorry =(. The Google API is very nitpicky so it takes a lot of trial and error to get it working. But the good news is that I took care of the hard part, which is figuring this stuff out for you =).
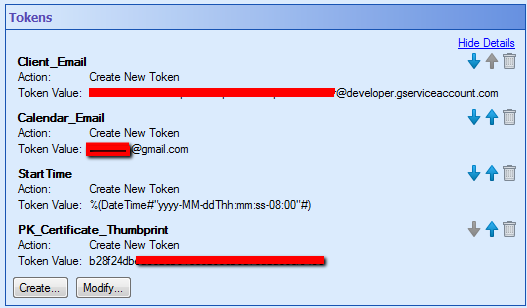
Our initial setup is an Assign Token Values with the following tokens:
Client_Email
The "Email Address" field you recorded above; something like "numbers-stuff@developer.gserviceaccount.com"
Calendar_Email
This is the name of the calendar we are viewing. For example, something like MyEmail@gmail.com.
Start Time
%(DateTime#"yyyy-MM-ddThh:mm:ss-08:00"#)
PK_Certificate_Thumbprint
The Certificate Fingerprint that you found in Step 1. Note that this is not something which is as sensitive to share as, say, a password, but when you publish the Workflow, this will be stored in the database. Nonetheless, it should not be a security concern in a proper setup.
Here it is, with some redactions (note, your thumbprint will vary from mine):
Step 5: The Workflow: Token Signing Script
Add a Script activity, set it to C#, and replace the "Script1" code with this script:
public class Script1 : ScriptClass90
    {
        private string GetBase64UrlEncoded(string input)
        {
            byte[] bytes = Encoding.UTF8.GetBytes(input);
            return GetBase64UrlEncoded(bytes);
        }

        private string GetBase64UrlEncoded(byte[] input)
        {
            string value = Convert.ToBase64String(input);
            value = value.Replace("=", string.Empty).Replace('+', '-').Replace('/', '_');
            return value;
        }

        /// <summary>
        /// This method is run when the activity is performed.
        /// </summary>
        protected override void Execute()
        {

            DateTime baseTime = new DateTime(1970, 1, 1, 0, 0, 0, 0, DateTimeKind.Utc);
            DateTime now = DateTime.UtcNow;
            int ticksIat = ((int)now.Subtract(baseTime).TotalSeconds);
            int ticksExp = ((int)now.AddMinutes(55).Subtract(baseTime).TotalSeconds);
            string clientEmail = this.GetTokenValue("Client_Email").ToString();
            string jwtHeader = @"{""alg"":""RS256"",""typ"":""JWT""}";
            string jwtClaimSet = string.Format("{{" +
                                               @"""iss"":""{0}""," +
                                               @"""scope"":""https://www.googleapis.com/auth/calendar.readonly""," +
                                               @"""aud"":""https://www.googleapis.com/oauth2/v3/token""," +
                                               @"""exp"":{1}," +
                                               @"""iat"":{2}" +
                                               "}}", clientEmail, ticksExp, ticksIat);
            string base64jwtHeader = GetBase64UrlEncoded(jwtHeader);
            string base64jwtClaimSet = GetBase64UrlEncoded(jwtClaimSet);
            string signingInputString = base64jwtHeader + "." + base64jwtClaimSet;
            byte[] signingInputBytes = Encoding.UTF8.GetBytes(signingInputString);
            string fingerprint = this.GetTokenValue("PK_Certificate_Thumbprint").ToString();
            X509Certificate2 pkCert = null;
            X509Store store = null;
            try
            {
                store = new X509Store(StoreName.My, StoreLocation.LocalMachine);
                store.Open(OpenFlags.ReadOnly);
                foreach (X509Certificate2 cert in store.Certificates)
                {
                    if (cert.HasPrivateKey && cert.Thumbprint.ToLower() == fingerprint.ToLower())
                    {
                        pkCert = cert;
                        break;
                    }
                }
            }
            finally
            {
                if (store != null)
                {
                    store.Close();
                }
            }

            if (pkCert == null)
            {
                throw new Exception("Signing certificate not found.");
            }

            RSACryptoServiceProvider rsa = (RSACryptoServiceProvider)pkCert.PrivateKey;
            CspParameters cspParam = new CspParameters
            {
                Flags = CspProviderFlags.UseMachineKeyStore,
                KeyContainerName = rsa.CspKeyContainerInfo.KeyContainerName,
                KeyNumber = rsa.CspKeyContainerInfo.KeyNumber == KeyNumber.Exchange ? 1 : 2
            };

            RSACryptoServiceProvider cryptoServiceProvider = new RSACryptoServiceProvider(cspParam) { PersistKeyInCsp = false };
            byte[] signatureBytes = cryptoServiceProvider.SignData(signingInputBytes, "SHA256");
            string signatureString = GetBase64UrlEncoded(signatureBytes);
            string finalJwt = signingInputString + "." + signatureString;
            this.SetToken("Signed_JWT", finalJwt);
        }
    }
Add the following 2 lines under the rest of the "using" statements:
    using System.Security.Cryptography;
    using System.Security.Cryptography.X509Certificates;
At the bottom pane in the Script Editor, you will see a tab that says Script Tokens. Select that, and click the New Token button (top left on the pane, first icon). Call this token Signed_JWT (You can optionally select the "String" checkbox as well). This step will make the script create a token to store its result, which we will need in order to get access to the API (the token will be called %(Script_Signed_JWT) outside of the Script activity).
For the Calendar example I'm providing, you do not need to modify any actual code; all the "inputs" to the script are provided from the Assign Token Values activity we defined in step 4. If you want to use other APIs though (such as the Gmail API, Directories, etc), then I'll have to expand the script to let you do so.
I don't want to go into the script in too much depth, but I can answer questions if you'd like (or if you want, I can go thru it step-by-step). Note that there is nothing in this script which could be considered a security concern, so it's all safe =).
Step 6: The Workflow: Web request for Access Token
The "Access Token" is the thing which we need in order to get access to your data using the Google API. The Script in Step 5 basically does a bunch of crypto stuff using the Certificate we stored in Step 3, which lets you ask for the Access Token while at the same time proving that you are not an impostor. Now in this step we can use the result from the script to send a Web Request so we can actually get the Access Token.
In an Http Web Request activity, create a new Web Service (call it Google API or something) and set the Host on it to https://www.googleapis.com.
Under Request:
1) Select POST from the Method dropdown.
2) Under URI put /oauth2/v3/token
3) Under Content Type, put application/x-www-form-urlencoded
4) Under Content Body, put grant_type=urn:ietf:params:oauth:grant-type:jwt-bearer&assertion=%(Script_Signed_JWT)
Make absolutely sure that you don't add any accidental spaces or newlines in the Content-Body!! This will make it not work!!!!!
That's it for this activity. Now we'll want to get the response from it.
Step 7: The Workflow: Capturing The Access Token
Remember when I said in my class that many Web APIs play by the rules and let you request an XML response? Well, Google doesn't play by the rules =(. They only return JSON responses.
We'll have to use pattern matching to get the Access Token. It's not so bad though.
1) Create a Pattern Matching activity.
2) Create a token in it called AccessToken
3) Set the Input to %(HTTPWebRequest_Content)
4) Set the Pattern to "access_token":\s*"([^"]*)"
Make sure to include the double quotes above!!
5) Set it to First Match only, and hit OK
Now we have the AccessToken itself rather than just a JSON response.
We need to do one more thing here
1) Create another Assign Token Values activity.
2) Create a new token named Auth_Header
3) Set the value to Bearer %(PatternMatching_AccessToken)
Step 8: The Workflow: The Actual Http Web Request
Now that we have the AccessToken (and the properly formatted Authorization header with this token), we can actually access the API! Yippie! Whoa, you're still reading this? Good job =D
Create a new HTTP Web Request activity.
1) Set the Web Service to the same one as Step 6 (Google API or whatever).
2) Set the URI to /calendar/v3/calendars//%(Calendar_Email)/events?timeMin=%(StartTime)
Note the double slash before the Calendar_Email! This is not a typo!!
3) Click the Advanced Properties gear on the top left of the Properties pane
4) Click the Request Headers box
5) On the left dropdown, select "Authorization"
6) To the right of that, type %(Auth_Header)
7) Hit OK.
Publish your Workflow. We're done! Can you believe it?? Well, actually we're not totally done... unless by a miracle this works on the first time =). As I mentioned many times, the Google API is SUPER finicky so it'll likely take a bit of trial-and-error to get things working. On the plus side, we didn't need to use any 3rd party libraries.
Your final Workflow should look something like this:
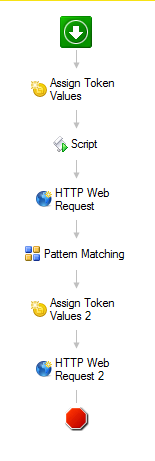
If this succeeds, you might also notice that right now we don't have anything particularly useful other than the knowledge that we got a successful response. We'll have to add some processing steps to get this response and do something useful with it, like using pattern matching to get a list of the event names and dates or something. I'll leave that part to you (unless you need help, in which case, let me now =)).
Oh, there is one other thing: You will likely notice that at first you might get an empty list of events even though there should be events (you might see them getting returned in the Google playground, for example). To fix this, make sure to share the calendar with your Service Account email address!! Otherwise the service account won't be able to see the calendar. This stumped me for like a solid hour.
Troubleshooting:
I can't promise to be able to help too much with troubleshooting; it took me a good long time to get this working outside of Workflow before I put it into the designer. Once the non-Workflow steps were done though, bringing it together into WF wasn't hard. I'd say I spent the most time (99%+) just getting that Script working outside of Workflow (using Visual Studio). Lucky for you, it's all written up now =)
There are mainly 4 errors you are likely to see:
1) "error: invalid_grant": Unfortunately, this is the generic error for "something went wrong". It could mean almost anything, but it means something went wrong within the first 3 WF activities (most likely in the Script). I hope you don't get this error! Make sure that your tokens in the first activity are as I described them and all the steps are done.
2) Something about a token signing key. For example, The signing key does not exist or something of the type. Remember that IT guy that I suggest you bring with you on this trek? Or maybe you're the IT guy... well, in either case, this means that the certificate which you imported into the cert store does not give private key rights to whatever is running the Workflow Server (or Designer if you are testing the script from the designer). You need to give private key rights to the signing cert for this to work. I can give some suggestions here if you need guidance.
3) 404 response. This most likely indicates either that you did not enable the particular Google API from the Dev Console or that you did not give rights to the calendar, email inbox, etc for the service account email address.
4) 401 response. The specified AccessToken doesn't have rights to what you are trying to do. Most likely you need to either configure this from Google or you configured something incorrectly here... almost certainly the latter.
While troubleshooting, make sure to check the Tokens tab in the Workflow Instance details to see what the status is during the various steps. For example, it might be useful to see whether or not the errors occurred in the first or second Http Web Request. I'd bank on most issues happening in the first one.
Phew, that's it for now. I hope someone actually made it all the way to here =D. I'll edit this solution as needed to answer questions.