You are viewing limited content. For full access, please sign in.

Question

Question

Moving file from Network Drive folder to Imported Folder after import process completes

asked on March 3, 2014

I have users that use a workflow to import pdf documents to laserfiche which works fine.


However after the document is imported into laserfiche the user needs to move the file from a network drive location, for example "J:\for_importing" to "J:\Imported_to_LaserFiche".


This is for a kind of clean up so the user knows that the file was already imported into laserfiche.


Right now the user does this manually and drags and drops the file from "J:\for_importing" to "J:\Imported_to_LaserFiche".  


My question is, can this be done in the workflow?


0 0

Replies

replied on March 3, 2014

Are you using a script to import the document in Workflow?

0 0
replied on March 3, 2014

No.   The User chooses import from LaserFiche Client then Chooses a template and enters the needed field data.

0 0
replied on March 3, 2014

Where does Workflow come into play then? If they're just importing through the Client, they don't need to use a network drive. They can import from anywhere on the machine.

0 0
replied on March 3, 2014

I will try to explain what the user does:


-  The user opens the folder "J:\for_importing"  in windows and selects and opens the file "testing.pdf" in adobe reader.  The user then looks over the "testing.pdf" document and notes some specific information like the following:


ContractName, VMNumber, ContractorName, ContractAgreementDate


- The user then launches LaserFiche and chooses to import and selects the "testing.pdf" file.  The user then selects the template in this case "Contracts" and inputs the relevant field data, which was noted before.


-  Based on the data entered, laserfiche will name , the new imported file and place in a folder reflecting the ContractAgreementDate noted before.  I think this is really where the workflow comes into play.  When naming and placing the new file.  

-  After that is done.  Currently the user will manually go into "J:\for_importing" and select the file "testing.pdf" that they just finished bringing into laserfiche and the user will drag and drop "testing.pdf" into "J:\Imported_to_LaserFiche".  And will continue to the next pdf document in "J:\for_importing"  repeat the process.


-  So the moving of the file at the end is just a cleanup to keep track of the files that were brought into laserfiche.


- I hope this helps.  


0 0
replied on March 3, 2014 Show version history

Do you have Import Agent? It has the ability to do what you are looking for. It can import files from a particular folder and then move them to another folder when it's done. However, it's made to work in an automated fashion so you'd have to craft rules that would fit into your environment and the way users do their work.


If it had to be done from Workflow, I suppose it might be possible to write a script to do the move, if the user that Workflow runs as had the appropriate permission on the network share.

0 0
replied on March 3, 2014

How would I go about doing that?  I am fairly new to laserfiche.

0 0
replied on March 4, 2014 Show version history

I've never done this in Workflow, but theoretically you could use a Script Activity. Anything you can do in .NET you can do in Workflow using scripts. I don't know what extent Workflow sandboxes what scripts can do, but you should be able to do all the standard file I/O operations. You could write the code directly in the script window or build a custom DLL that you call.


There's not enough room here to write a full tutorial, but you'll probably need a developer if you want to go that route. Otherwise, I'd recommend seeing if Import Agent can satisfy your needs. It would be an extra purchase, but it will probably cost less when all is said and done than going the scripting route.

0 0
replied on March 4, 2014

Nicholas - I have a custom activity available that allows workflow to move, copy, rename, and/or delete Windows files from a UNC path or mapped drive.  The free 30 day demo is available for download at http://www.qfiche.com/products.html.  I am slowly adding custom workflow activities to my 'Qfiche Toolkit' and the FileIO activity is just one of them.  Please try the free demos and feel free to contact me at cprimmer@qfiche.com if you have any questions.

1 0
replied on March 4, 2014

Hey Devin,


How would I go about creating a script activity to do this ?  

0 0
replied on March 4, 2014

Hey Cliff,


  I would like to create an activity that will do what I need?  I feel that this can be done without a cost.  If you could provide some information as to what would need to be done, or point me in the right direction , that would be great.


Thanks.


0 0
replied on March 4, 2014

Nicholas - If you don't want to purchase the Qfiche custom activity then I would probably stick with a workflow script activity to try to make this work.  To try to build a custom activity yourself requires some additional tools (Visual Studio) and development experience.


I would start with the MSDN references that Devin mentions above (file I/O operations).  The Qfiche custom activity uses that same set of IO methods listed in that reference.  I would also suggest that if you are planning on moving the file I would actually copy it to the target directory and then delete the source file instead of using the IO move method.  It is my experience that this approach has fewer problems with OS file locking than the move method.


Let me know if you need anything else.


Good luck!

1 0
replied on March 4, 2014

I am looking into it.  It seems to me that a lot of it has to do with setting up the Workflow Tokens, which act as the variables representing the document and UNC path.  Does that seem right ?

0 0
replied on March 4, 2014

Yep, the actual code to move the file (copy to the target and delete the source) is only two lines of code with a couple of parameters each.  The majority of the rest of the code is error handling and setting up for the move.  The key to tying the workflow 'move' script with your client PDF import is to capture the original PDF filename so that you can use it in your script.  It sounds like the target and source folder names will not change frequently so you could 'hard code' them in the script as constants or variables early on and then do some type of concatenation with the PDF filename to reference the actual file at move time.  Perhaps passing the PDF filename to the script via a token as you mention.

0 0
replied on March 4, 2014

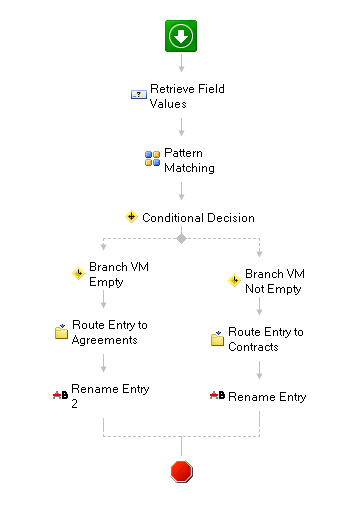
Hey all I figured I would try and provide some more information.  The workflow that is being used currently looks like the following:


The workflow details are below:


Contracts:

Workflow Details:


Retrieve Field Values:

Entry: Starting Entry

Field values to retrieve:

• ContractorName

• VMNumber

• ContractAgreementDate

• AnticipatedTerminationDate

• ContractTerminationDate

• ContractName


Pattern Matching:

Year

        Input: %(RetrieveFieldValues_ContractAgreementDate)

        Pattern: \d?\d/\d?\d/(\d\d\d\d)

        Case Sensitive: Yes

        Return: First match only

Decade

        Input: %(RetrieveFieldValues_ContractAgreementDate)

        Pattern: \d?\d/\d?\d/(\d\d\d)\d

        Case Sensitive: Yes

        Return: First match only


Conditional Decision:


Branch VM Empty:

If all of these conditions are true

        %(RetrieveFieldValues_VMNumber) is empty


Route Entry to Agreements:

Move the Starting Entry to \Village Clerk\Agreements\%(PatternMatching_Decade)0-%(PatternMatching_Decade)9\%(PatternMatching_Year)


Rename Entry 2:

Rename the Starting Entry to %(PatternMatching_Year)-%(RetrieveFieldValues_ContractName)-%(RetrieveFieldValues_ContractorName)


Branch VM Not Empty:

If all of these conditions are true

        Starting Entry : Field (VMNumber) is not empty


Route Entry to Contracts:

Move the Starting Entry to \Village Clerk\Contracts\%(PatternMatching_Decade)0-%(PatternMatching_Decade)9\%(PatternMatching_Year)


Rename Entry:

Rename the Starting Entry to %(PatternMatching_Year)-%(RetrieveFieldValues_VMNumber)-%(RetrieveFieldValues_ContractName)-%(RetrieveFieldValues_ContractorName)


-------------------------------------------------------------------------------------------------------------------------------------


I hope this info will help in arriving at a solution.

0 0
replied on March 4, 2014

One way to make is simpler is to line up your physical path with your Laserfiche path. That way you could take the Laserfiche path and use the path token to tell your script what paths to use.


With your level of experience, you'll definitely need a developer to help you out, or buy the Qfiche activities.


Script activities are very powerful, but they require advanced knowledge of both Laserfiche and software development. Not really stuff we can help you with during a few quick posts.

1 0
replied on March 6, 2014

Well I know I am fairly new to laserfiche but I do have a fair amount of development experience.  Is there any tutorials I can look at.  To start, how would I go about integrating a script activity into the workflow?

0 0
replied on March 6, 2014 Show version history

Nicholas - There are two types of script activities available in the Workflow Designer.  They are the 'Script Activity' and 'SDK Script Activity'.  Use the SDK Script Activity if you want to interact with Laserfiche Entries (documents and folders).  If you don't need to interact with Entries then you can use the Script Activity.


Just drag-and-drop one of those activities onto the Designer canvas and then double-click on it to open up the script editor.  Once you have the script editor open you can use the Help menu item to see some script examples.  You can write your scripts in either VB or C# but real developers use VB!  wink


If you have access to the Laserfiche SDK then there are a lot of additional examples and object descriptions available there.


Here is a link to some additional SDK resources on the support site "https://support.laserfiche.com/index.aspx?product=SDK"


To make the water a little muddier; there are two distinctly different development libraries for Laserfiche.  LFSO (Laserfiche Server Objects) and RA (Repository Access).  LFSO is the older of the two libraries and is being phased out so I would focus on using the RA libraries when you start writing scripts.


If you are using Workflow 9.1 then the default is the RA libraries but if you are using an earlier version of Workflow then the default will be the LFSO libraries.


Most of the script documentation available is for the LFSO model but that is gradually changing.


Lots of information but I am confident that you can get through it!


Let me know if you have additional questions or need specific help...

1 0
replied on March 6, 2014 Show version history

Nicholas - Here is a code snippet that moves a file using the System.IO functions. 


Note: the service account that workflow is running under has to have the appropriate permissions to copy and delete files in the source and target folders.


The code below is in a workflow Script Activity;

Imports System
Imports System.Collections.Generic
Imports System.ComponentModel
Imports System.Data
Imports System.Data.SqlClient
Imports System.Text
Imports System.IO   'NOTE: You need to add this namespace reference...

Namespace WorkflowActivity.Scripting.Script
    '''<summary>
    '''Provides one or more methods that can be run when the workflow scripting activity is performed.
    '''</summary>
    Public Class Script1
        Inherits ScriptClass90
        '''<summary>
        '''This method is run when the activity is performed.
        '''</summary>
        Protected Overrides Sub Execute()
            'Write your code here.

            'Wrap all of the code in a Try/Catch to trap any errors...
            Try
                'A little bit contrived.  Everything hard coded
                'You will probably want to pass these into the script as tokens instead...
                Dim sourceDirectory as String = "C:\TestData\Source"
                Dim targetDirectory as String = "C:\TestData\Target"
                Dim filename as String = "test.tif"

                'NOTE: If the source or targets do not exist then the routine 
                'will throw an error...
                'NOTE: If you do not use the 'Imports System.IO' in the header
                'you will have to use the full namespace reference for these methods,
                'i.e. System.IO.File.Copy(....
              
                'The two lines of code to move a file (copy and delete vs move)...
                File.Copy(Path.Combine(sourceDirectory, filename), Path.Combine(targetDirectory, filename), True)
                File.Delete(Path.Combine(sourceDirectory, filename))

            Catch ex As Exception

                'If there is an error this line will write it out 
                'to workflow as a trackable error...
                WorkflowApi.TrackError(ex.Message)

            End Try

        End Sub

    End Class

End Namespace


1 0
replied on March 6, 2014

Depending on how many files and your local network you'll probably want to put that script in a parallel activity. If the file copy operation takes a long time or there's an issue with it, you don't want it to block the rest of the workflow. Better yet, put the script activity in it's own Workflow and then fire and forget from your main workflow.

0 0
replied on March 6, 2014

Hey Cliff,


Thank you for the information and guidance you are providing.  I really appreciate it.  I will go over what you posted tonight and if I have any questions I will post back here.  Thanks again.

0 0
replied on March 6, 2014

No problem!  You are also welcome to PM me at cprimmer@qfiche.com as well.

0 0
replied on March 10, 2014

Just an update.  I am still reading over some docs.  Any documentation on passing the filename and directory paths into the script as tokens?

0 0
replied on March 11, 2014

Would it be something like :


LFDocument doc = (LFDocument)this.Entry;
this.SetToken(“GUID”, doc.EntryGUID);

0 0
You are not allowed to follow up in this post.

Sign in to reply to this post.