Hi Shan,
You can remove the button that navigates back to the folder by adding &mode=embed at the end of the URL if you are using an iframe with the web client or a weblink in your forms. The only drawback is that if you save the form in Laserfiche with the signature, the iframe will be empty.
If you want to compose the contract in HTML, you can use a lookup rule to generate the HTML from a SQL query, or store all the variables as hidden fields in the form and assemble the HTML using a JavaScript script. You can use the rich text field and even embeed the base64 image of the signature field in the HTML generated, then save the forms as a tiff or PDF or merge the rich text content with a word document.
The image of the signature in base64 can be retreived by the workflow and can be applied to a PDF via script if needed...
On our side, typically, for this type of scenario, we use a two-form process: one form to gather the required information to populate the PDF or Word document, and a second public form for signing. When the first form is submitted, we merge the information into the PDF or Word document. This document can then either be sent as an attachment via a workflow or exported via a script as a PNG file to a folder hosted in IIS to be embedded in the second forms.
When sending the email with the link to the signing form, I add URL parameters to the form URL that include the exported file name and a transaction ID that you generate. A script on the form then loads the PNG. When the form is saved, the contract and the signature are captured together in a single save.
Sample javascript on the forms
var pdfname = LFForm.getFieldValues({fieldId: 61}); //Field that contains the png file
var html='';


var html = '<img src="https://lasericheserver/Contract/Contract_'+pdfname+'.png" width="100%" height="100%"/>';

LFForm.changeFieldSettings( {fieldId: 59},
{content: html} ); //fill the custom html field
Sample CSS
.signature{
   background-color:#FFFFFF !important;
}
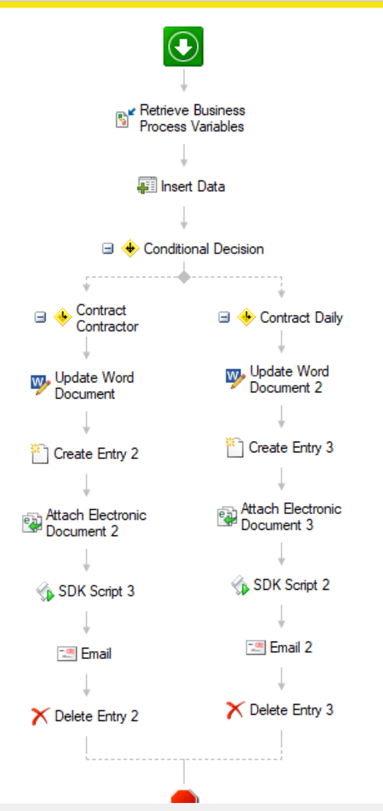
sample workflow here I am using a word document and converting it to PDF with the "update word document" but you can also do a PDF merge directly.
Sample script in c#, here we are using PDFiumSharp to export the PDF in png but you could also use the new schedule generate page activity from laserfiche and export the generated page has png.
namespace WorkflowActivity.Scripting.SDKScript3
{
    using System;
    using System.Collections.Generic;
    using System.ComponentModel;
    using System.Data;
    using System.Data.SqlClient;
    using System.Text;
    using Laserfiche.RepositoryAccess;
    using Laserfiche.DocumentServices;
    using System.IO;
    using PDFiumSharp;
    using System.Drawing;
    using System.Drawing.Imaging;

    /// <summary>
    /// Provides one or more methods that can be run when the workflow scripting activity is performed.
    /// </summary>
    public class Script1 : RAScriptClass110
    {
        /// <summary>
        /// This method is run when the activity is performed.
        /// </summary>
        protected override void Execute()
        {


            string myUniqueFileName = string.Format(@"{0}", Guid.NewGuid());
            string dPath1 = @"C:\inetpub\wwwroot\Contract\Contract_"+myUniqueFileName+".png";
            WorkflowApi.TrackInformation(myUniqueFileName);

            DocumentExporter de  = new DocumentExporter();
            DocumentInfo di = Document.GetDocumentInfo(Int32.Parse(GetTokenValue("CreateEntry2_OutputEntry_ID").ToString()), RASession);
            WorkflowApi.TrackInformation(GetTokenValue("CreateEntry2_OutputEntry_ID").ToString());

            MemoryStream msIN = new MemoryStream();
            de.ExportElecDoc(di,msIN);
            PdfDocument doc = new PdfDocument(msIN.ToArray());
            PDFiumSharp.PdfPage page = doc.Pages[0];
            PDFiumBitmap dbitmap = new PDFiumBitmap(int.Parse(page.Width.ToString())*2,int.Parse(page.Height.ToString())*2, true);
            page.Render(dbitmap);
            MemoryStream msOUT =  new MemoryStream();
            dbitmap.Save(msOUT);
            msOUT.Position=0;
            Bitmap src = new Bitmap(msOUT);
            // Crop for the part of the signature
            int maxHeight = 800;
            Bitmap croppedImage;
            if (src.Height > maxHeight)
            {
                Rectangle cropRect = new Rectangle(0, 0, src.Width, maxHeight);
                croppedImage = src.Clone(cropRect, src.PixelFormat);
                src.Dispose();
            }
            else
            {
                croppedImage = src;
            }

            Bitmap src2 = new Bitmap(croppedImage.Width, croppedImage.Height);
            Graphics g = Graphics.FromImage(src2);
            g.Clear(Color.White);
            g.DrawRectangle(new Pen(new SolidBrush(Color.White)), 0, 0, src2.Width, src2.Height);
            g.DrawImage(croppedImage,0,0, src2.Width, src2.Height);
            src2.Save(dPath1, ImageFormat.Png);

            WorkflowApi.SetActivityTokenValue("DOCNAME",myUniqueFileName);
        }
    }
}
I hope that this will be usefull to you.